How to Setup Shipping for Free Products on Shopify
- Oct-16-2017
- Ameer Rizvi
- 6 comments
Dropshipping offers a multitude of opportunities for new eCommerce stores to quickly startup operations. One of the opportunities that e-store owners have at their disposal are free products that only require paying for shipping. These products can include everything from mugs, t-shirts, jewelry and other lightweight items.
The common question that I have noticed with these “pay shipping only” items is just how to setup shipping for free products.
Setting up Shipping Rates for Free Products
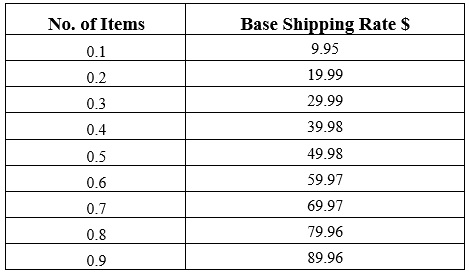
Before we begin the process there is one important task to complete before moving on to your Shopify dashboard. What we will do is create a table in an excel worksheet, based on research & personal assumptions. This sheet will maintain the range for the number of free items and their respective base shipping rate. Here is an example:

This table will be used for reference purpose only, but, it is very important to create one. This base shipping rate will apply for all free products, but, why is the no. of items column in decimals? We will discuss as we move on.
To setup shipping on your free products begin by logging into your Shopify dashboard. From there follow these steps:
- From your Shopify home screen go to Settings

- Click Shipping from the list of options

- Scroll down locate Zones & Rates

- Under Zones & Rates you will see shipping zones based on:
- Weight
- Price
- Click the EDIT option for “Based on Weight”

- In the menu that comes up locate “Weight Based Rates” and click the ‘Add Rate’ button next to it

- Remember the Excel sheet we created above with the number of items & shipping rates, refer to it.
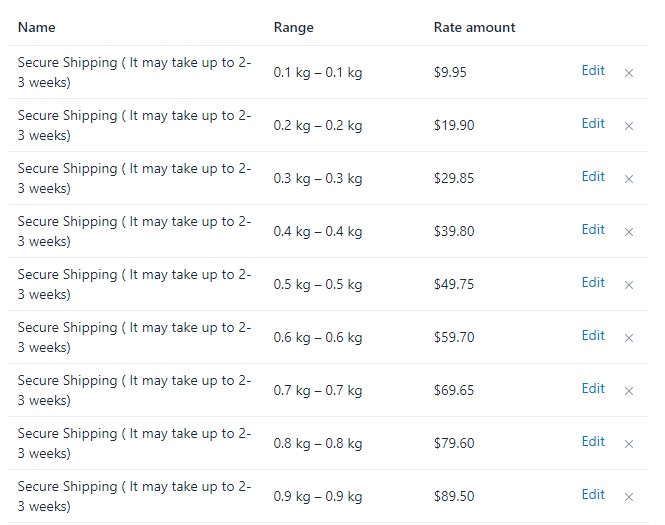
- A new box will pop open titled ‘Add Weight Based Rate’. Several options will be available to you, fill them out as follows for number of items:
- Name – Secure Shipping (item may take upto 4 weeks to deliver)
- Range – Max = 0.1 , Min = 0.1
- Rate – Leave this feature unticked
- Rate Amount – $9.95
- Finally, click Done
9. Repeat step 8 for all number of item shipping rates.
We have now successfully added the shipping rates per items bought, for free products. Our next step is publishing these rates to all product pages. It’s time to head over to your product collection from the Shopify dashboard. Do remember you have to assign shipping rates to all free product pages.
- Open free product page(s)
- Scroll to the bottom of the product page, and locate “Variants”
- Select all the variants for your free product
- Next, click Edit Variants > Add Fields > Weight
- Under the Weight section assign both product variants the values from 0.1 – 0.9
- Repeat step 5 for all your free product pages
Once you have assigned values to all free products it’s finally time to verify that shipping rates have been implemented. Return to the product page and click the ‘view’ button, then:
- Add item to cart
- Proceed to checkout with the item
- The new shipping rates should appear on the address, deliver & shipping page
This completes our guide to apply shipping to free products on a Shopify store.
See You Again Soon
I really hope the guide was helpful for my readers to setup shipping for free products on their Shopify e-stores. Remember to share my guide with other new eCommerce enthusiasts, and do leave feedback if I missed something. Stay connected with us through our Facebook, Twitter & YouTube profiles, also consider joining our mailing list to get all our guides in your inbox.


I love reading your article please keep sending me your guide.