How to Add Facebook Pixel to Your Shopify Store
- Mar-08-2018
- Dilawar Hussain
- 2 comments
Most new Shopify store owners find it very difficult to set up Facebook Pixel on their Shopify store. Most of them run into problems like no tracking activity, the pixel being inactive, and some other problems.
We understand how our new entrepreneurs might feel overwhelmed by the amount of knowledge available about Facebook Pixel.

You might have questions about how to add Facebook Pixel to Shopify, or how to add Facebook custom audience Pixel, or where you can find the Pixel ID.
Fret not, today we’re going to help you understand What Facebook Pixel is, what it does, and how you can use it on your Shopify store to optimize your Facebook Ad campaigns.
We will try our best to answer all our questions regarding Facebook Pixel and its integration with Shopify.
What is a Facebook Pixel? Why Should You Use it?
Facebook Pixel, in a nutshell, is a tool to track your Shopify visitors and audience. By integrating the Facebook Pixel on your Shopify store, you will allow Facebook to collect crucial data on your visitors, visitors’ interests, their behaviors, actions, and their demographic information.
In return, Facebook tracks people who are specifically interested in your offerings and your Ad campaigns will see much more success.
Pixel tracks specific group of visitors who perform certain actions, visit certain pages, look a certain products and gives you a targeted data that you can use to narrow down your target audience for an Ad campaign.
Facebook Pixel allows you to optimize your ads and increase your sales through automatic bidding which targets specific people who are more likely to place an order and reach the right audience by targeting only those people who actually visited/ordered from your store and their lookalikes (people who share their interests and likes).
Facebook is the go to social media platform to kick start the digital marketing campaigns for most of the new entrepreneurs.
Using Facebook Pixel with your Shopify store gives you the opportunity to learn more about your visitors, their behaviors, interests, and demographics. You can use this data to run targeted Facebook ad campaigns for multiple specific groups of people.
How to Create Facebook Pixel?
Before you add Facebook Pixel to Shopify, you need to create the Pixel in your Facebook Ads Manager. Here’s how you can do it.
1. Login to your Facebook account and Head over to Facebook Ads Manager.

2. Click the Navigation Panel and select Pixels under the Measure & Report section.
![]()
3. Click Create a Pixel button on the new page. A new window will pop-up.
![]()
4. Enter a Pixel name. You can create one Pixel per ad account. However, Upgrading to Business Manager will give you up to 10 additional pixels. Click Create.
5. Now you can install the Pixel on your Shopify store. Since we’re using Shopify, click “Use an integration or tag manager” to automatically integrate the Pixel with your Shopify.

6. Choose Shopify from the list of partners. You will see a list of instructions and videos to add Facebook Pixel to Shopify, but we will walk you through the process.
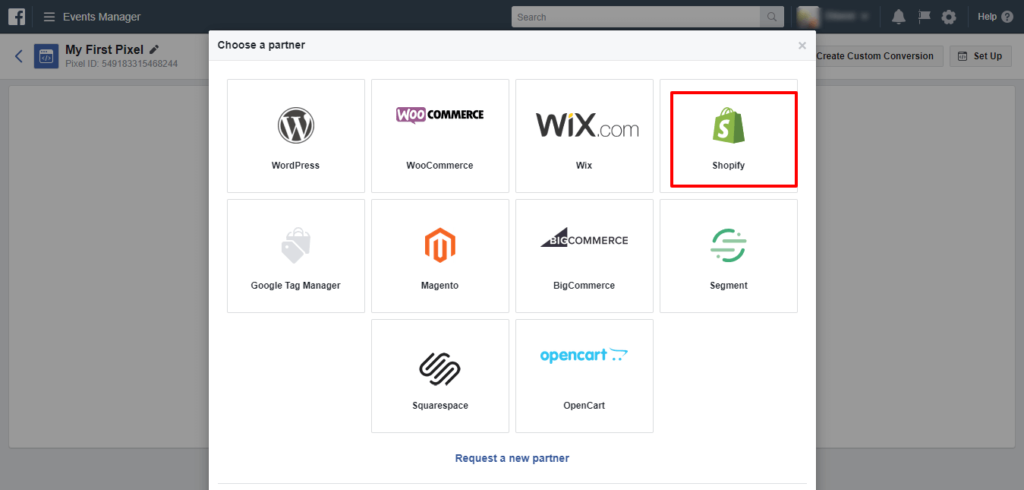
How to add Facebook Pixel to Shopify?
Now, that you have created an all new Facebook Pixel. It’s actually time you put it into action and add the Facebook Pixel to your Shopify store. Here’s how to do it.
1. You must know how to find Facebook Pixel ID. It’s quite simple. Head over to Facebook Ads Manager and navigate to Pixels.
![]()
2. At the bottom, you will see your Pixel name and right beneath it, Pixel ID. Copy it.
![]()
3. Head over to your Shopify Store Dashboard. On the left, click Online Store > Preferences.

4. Scroll down to find Facebook Pixel section and paste your Pixel ID in the provided field and hit Save.
![]()
5. Go back to Facebook Ads Manager > Pixels to see if the Pixel is active. If it’s green then it’s working and you can start tracking your visitors. If it’s not working then follow the steps again, carefully.
![]()
How to Test your Facebook Pixel?
Following is a simple and easy way that you can use to find out if your pixel is working or not.
Step 1:
Just go to business.facebook.com. Go to your Ads Manager. Click the icon in the top-right and then click Pixels.

Step 2:
Afterward, click Test Events.

Step 3:
Now open your website. Go to any product page. Then head over to your Facebook business Admin.
Here you will see all your data showing up.

As you move to the other pages on your website, for example, if you add the product to the cart. You can see the related event triggering in the Pixel area.

If you initiate checkout and other events, you can see all the triggering events in your Business manager.

This is how you test your Facebook Pixel to see if it’s working or not and if the events are triggering properly on your website.
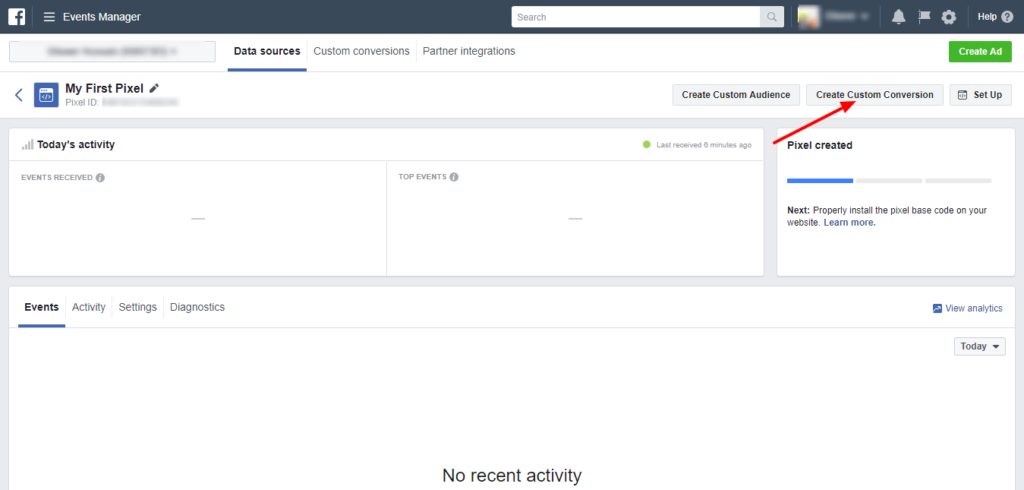
Getting the most out of Facebook Pixel
Your Pixel is up and running on your Shopify store. Now’s the time to optimize it to get the most out of it.
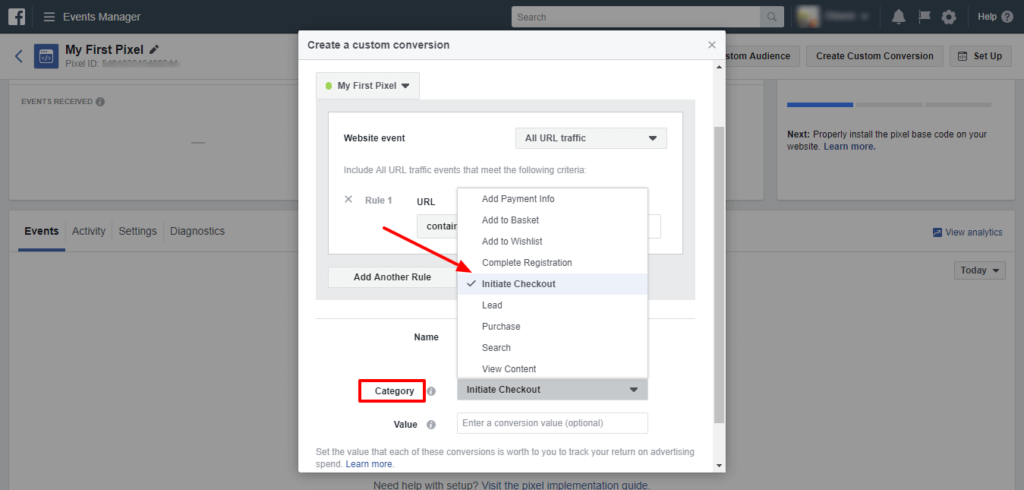
Create a Custom Conversion
A Custom Conversion is created by choosing a final completion page and naming the conversion type. Normally, the completion page a kind of thank you page or something similar. For example:
- Thank you for shopping with us, your product is on the way
- Thanks for signing up with us, you will receive your first email shortly
- Thank you for your comment, here’s a freebie
Because the new Facebook Pixel is active on all pages of your Shopify store, it tracks when anyone visits a completion page – especially visitors who clicked on one of your ads.
Here’s how you can create custom conversions to track your customers’ conversion.
1. Head over to Facebook Ads Manager > Navigation Panel > Pixels.
![]()
2. Click Details, you will see a new page where all your tracking data is available.

3. Click Create Custom Conversion for a new pop-up bar.
4. Now, you add keywords for the URL you want to track. At the bottom choose a Category that defines the events that you want to track. Congratulations, you can now track the specific conversion page.
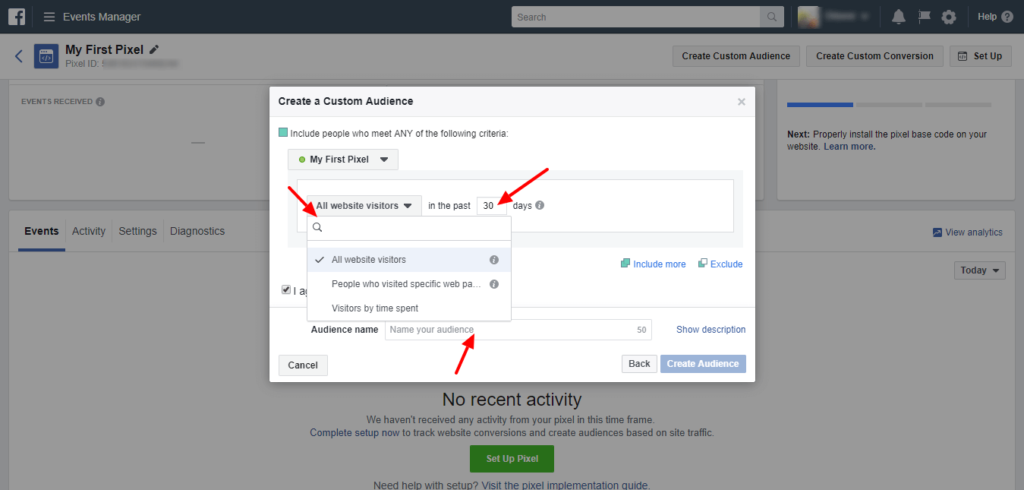
Create Custom Audience
Facebook lets you retarget your audience by using the Custom Audience feature in the Pixel. The Pixel tracks the movements, actions, of your visitors.
The Custom Audience feature lets you target specific group of peoples that share some properties. Some examples of the type of visitors include,
- Visitors who have visited your website in the past 24 hours
- Visitors who have visited your website in the past 180 days but have not been back in 30 days
- Visitors who have visited a specific page on your website
- Visitors who have visited a specific page on your website but not another specific page.
- Visitors who spent a specific amount of time on your website.
Audiences are independent from the ads. Once you create a custom audience, you can choose yourself when you want to advertise to it and what ads to show them.
Here’s how you can create a custom audience on Facebook Pixel.
1. Head over to Facebook Ads Manager > Navigation Panel > Pixels.
![]()
2. Click Details, you will see a new page where all your tracking data is available.
3. Click Create Custom Audience for a new pop-up bar.

4. Now, set up the criteria that these visitors must meet to be tracked. Enter the number of days that you want people to remain in your audience and add a name for your audience. Hit Create Audience to start tracking.
Congratulations you are now tracking a custom audience on your Shopify store with Facebook Pixel.
If for some reason the Facebook Pixel isn’t activating on your store, not tracking properly, or not working as expected, you can read our Facebook Pixel Helper guide to troubleshoot your Pixel issues.
Facebook Pixel Shopify Apps
Pixel Perfect
If you are not very fond of installing the Facebook pixel manually and want to make the process even simpler then Pixel perfect is the app for you.
It makes the installation of Facebook Pixel on your Shopify store quite simple and easy. You can just do a few clicks to install the Pixel on your Shopify store with Pixel Perfect.
It also lets you easily add events to any page of your store. You don’t need any prior coding experience as the app automates everything for you.
Pixel Perfect is priced at $14.99 per month.
Pixel Conversion Pro
This pixel app for Shopify helps train your pixel to become the best pixel out there. It tracks all the events easily on your store to optimize your pixel.
It can track multiple Pixel IDs to make it easier for you. Everything is done autmatically so all you have to do is install this app and let it do its work.
You can increase your conversion rate by optimizing your Pixel through this amazing Shopify app.
Trackify Pixel App
No need to know any coding or other programming related mumbo jumbo. Trackify Pixel app for Shopify lets you install the Facebook pixel on your Shopify store with just one-click.
You can also add multiple pixels to your Shopify store using this app which lets you have a secondary pixel on your store so you can have it as a backup to your primary pixel.
If you want to use multiple Pixels on your Shopify store then Trackify is the perfect app for you. Trackify has two different paid plan.
$24.95 – Allows you to use Two pixels on one store.
$49.95 – Allows you to use multiple pixels on a store.
Shopify Facebook Pixel Add to Cart
If you are unable to track the Add to cart event from your Facebook pixel then there’s something wrong with your event placement.
You add to cart event is supposed to be placed on the Cart page. This means you need to place it in the cart.Liquid file of your Shopify theme. Once done, it will fire properly and you will be able to track that event without any problems.
Multiple Facebook Pixels in One Shopify Store
Some people are looking for a way to use two Facebook pixels on one Shopify store. It’s possible, but it’s better you get it done by someone who knows coding.
You can drop one pixel simply through Shopify interface as mentioned above, but to use the other Pixel, you need to use the Google Tag Manager or hardcode the pixel directly in the theme file.
Just use the Facebook pixel helper extension to check if both the pixels are working properly. For the pixel that is dropped in via Google Tag Manager, make sure you have someone with dev experience take a look and also set up the datalayer /events correctly.
You May Also Like This:
Facebook Ads Account Disabled
11 Facebook Audience Insights Hacks To Generate Sales
Final Thoughts
The beauty of Facebook Pixel lies in the fact that it can be integrated in your Shopify store within minutes. You can start creating custom events, audiences, etc within minutes to track your customers.
Hopefully, you now understand how Facebook pixel works, why you should use it, how it’s added to Shopify, and how it tracks different events. Feel free to share your thoughts in the comments below.

Dilawar Hussain is a professional blogger who loves gaming, technology, and ecommerce. He spends his time testing new strategies, hacks, and tricks to help the ecommerce community.
 Facebook Audience Insights – A Helpful Illustrated Guide 2021
  Free Plus Shipping – How Free Plus Shipping Facebook Ads Work?
  Facebook Video Marketing Secrets to Get 10 Million reach in 14 days
  How To Get Verified on YouTube to Build Trust
Thanks for sharing this experience. Been looking through your posts. Awesome!
thanks for sharing how new Shopify store set up Facebook Pixel on their Shopify store.