Shopify Dropshipping 2021 Guide – Simplified for Beginners!
- Nov-13-2020
- Bilal Uddin
- 3 comments
Dropshipping has become a giant gateway to enter the ecommerce world as it has hit the $709.78 billion figure in 2020 represents the 18.5% retail sales of the USA.
More than 30% of internet retailers have already adopted the dropshipping method, and the ratio has been rising with every coming year.
However, a lot of newbie entrepreneurs are still unaware and curious to know Shopify dropshipping and how do dropshipping works.
Do not care when we are here.
Although, on our channel, there is plenty of content related to Shopify dropshipping and how it works. You can check it out here.
I realize the need of making a more comprehensive guide in which I show you step-by-step how to set up a Shopify store and how to start a dropshipping business in your Shopify store. Additionally, you can take a Shopify course if you need the guidance on how to start working with it
To understand Shopify dropshipping, I am breaking both terms Shopify and Dropshipping to define it separately.
What is Shopify?
Shopify is an ecommerce platform that provides help to create and customize your own ecommerce store.
You can use Shopify’s online store builder tools and themes to customize your store.
It is cloud-based and hosted platform that means you can operate Shopify from anywhere in the globe with just an internet connection.
What is Dropshipping?
Dropshipping is an answer to how to start an ecommerce business with ‘NO’ inventory.
Dropshipping is a model in which the retailer (you) does not keep any inventory but transfer the product directly from the supplier to your customer.

So far, you understand what Shopify and Dropshipping are.
Now, coming to the burning question, how do I start a dropshipping business with Shopify?
This guide will definitely help to get the best possible answer to your queries regarding Shopify dropshipping.
By the end of this post, I can assure that you will have all the required guideline to start your drop shipping Shopify business.
- How to Setup a Shopify Store Account
- How to Select a Theme for Shopify Store
- How to Install Oberlo in Shopify
- How to Add Products from Oberlo Chrome Extension
- How to Add Products from Oberlo App
- How to Semi-Automate Shopify Store with Oberlo
- How to Create Product Collection in Shopify Store
- How to Add Sales/Discounts in Your Products
- How to Add Free Shipping Option in Your Shopify Store
- How to Setup Payment Option
- How to Customize Your Shopify Store
- How to Add Menu to Shopify Store
- How to Add a Domain Name in Your Shopify Store
- How to Add Blog Page in Your Shopify Store
- How to Select the Best Shopify Plan
- 3 Simple Hacks to Find Product to Sell in Shopify Dropshipping Business
So let’s start with setting up a Shopify store.
How to Setup a Shopify Store Account
The process of Shopify dropshipping starts by setting up a store. The process of setting up a Shopify store is very easy to follow; here is what you need to do.
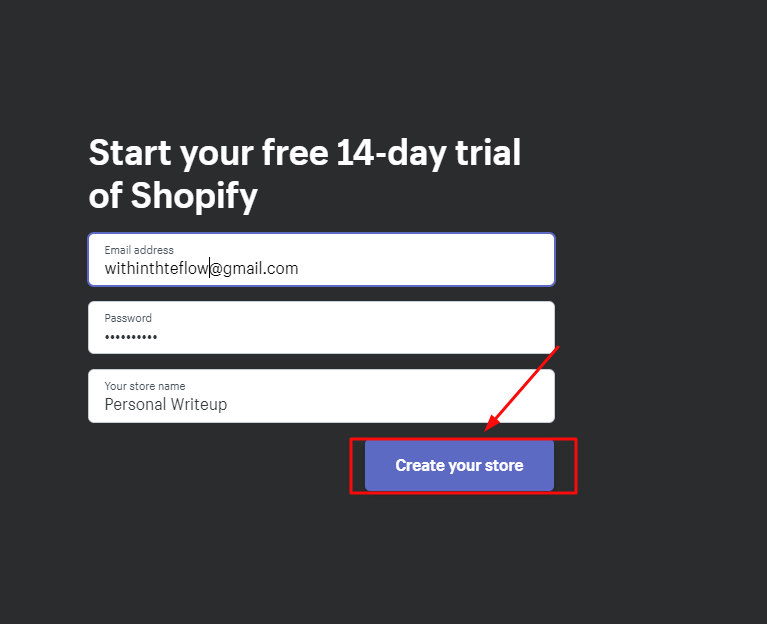
Go to Shopify.com and select ‘start 14-day free trial’
Write Email, Password, Store name and select ‘Create Your Store’
Try creating a unique name for your store using business name generator, because it would be vital in attracting your potential customers.
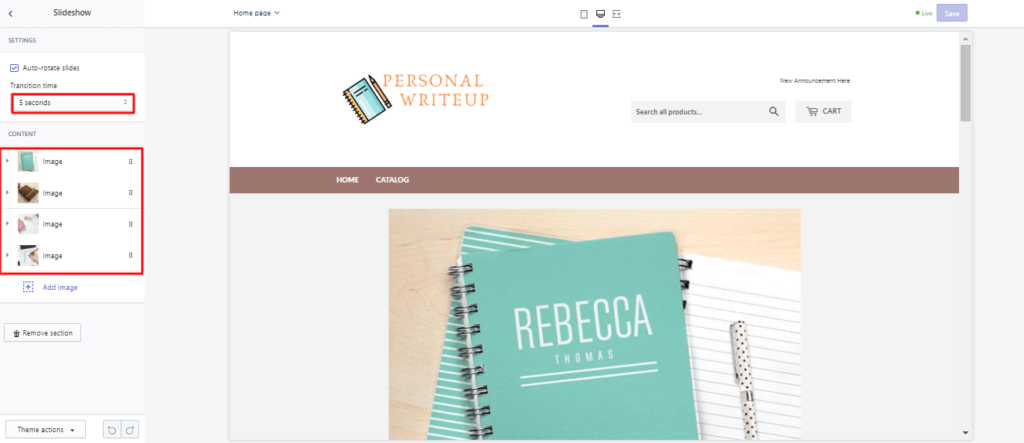
I selected the name ‘Personal Writeup’, as I am making a store to sell writing material like notebooks, notepads, diaries, etc.
Now, Shopify will ask you to tell something about yourself.
Well, it just for Shopify’s personal collection that has nothing to do with your store.
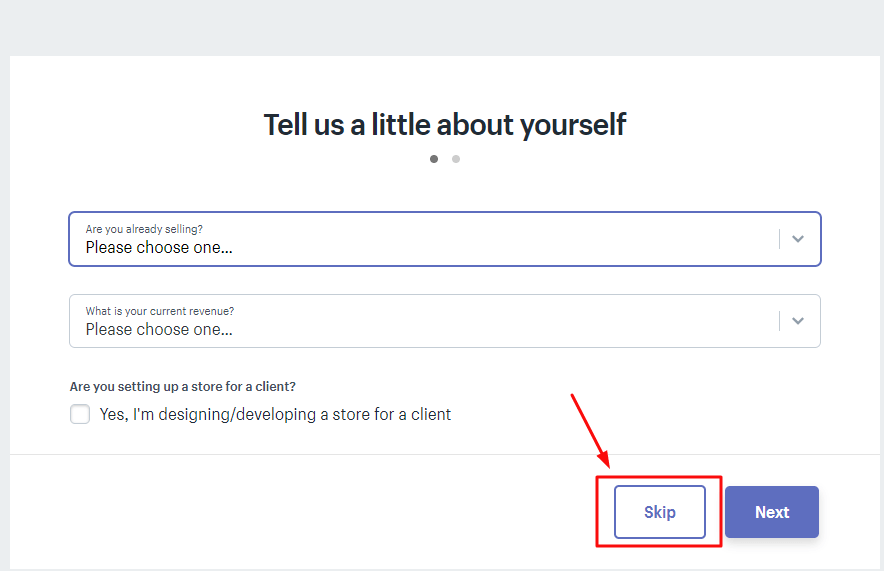
So, you either skip that part or fill-up that does not matter.
Add your personal information including name, address, and contact number.
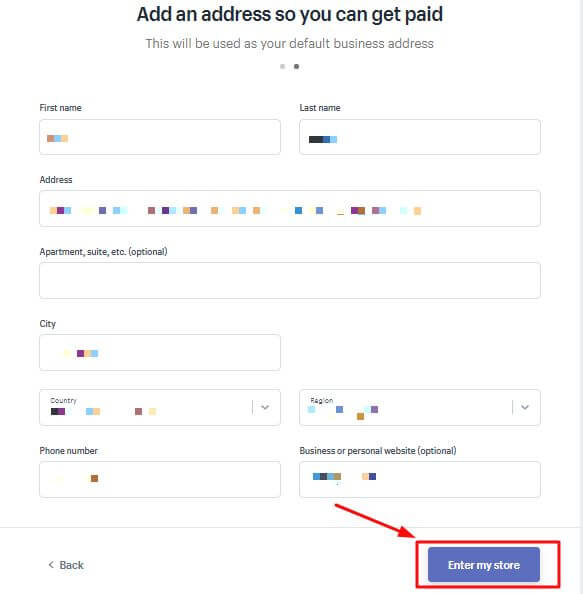
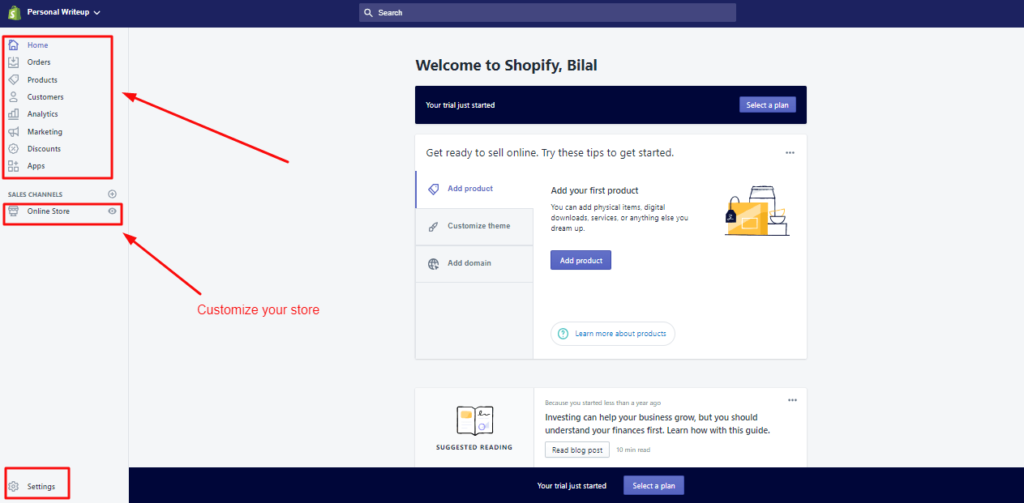
After adding the credentials, you will land on the dashboard of your Shopify store.
Your Shopify store account has been created.
How to Select Theme for Shopify Store
On your store dashboard, go to the left sidebar and click ‘Online Store’ to select your store theme.
Select explore free themes.
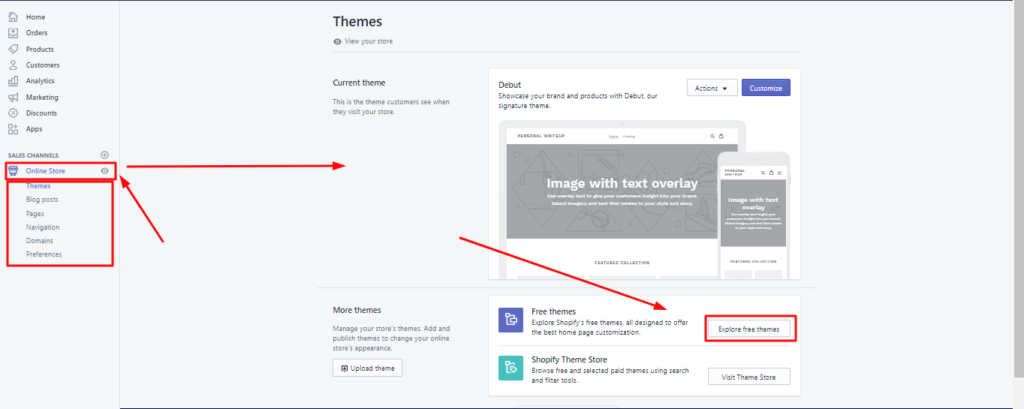
A set of multiple themes windows will pop-up, you can select the theme from the options as per your preference.

You can see the feature of themes by clicking it.
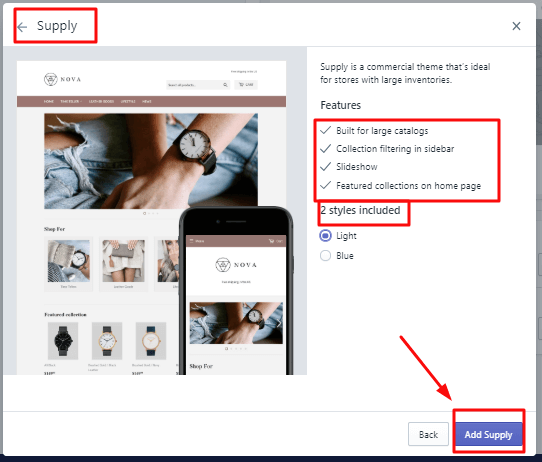
As I clicked on the Supply theme, it showed me all the features it has and the style it contains.
I selected the Supply theme by clicking Add Supply on the bottom right corner.
Now the theme has been saved, you can customize it as per your preference.
Theme Customization
You can start customizing your theme by either selecting from the notification or from the saved theme.
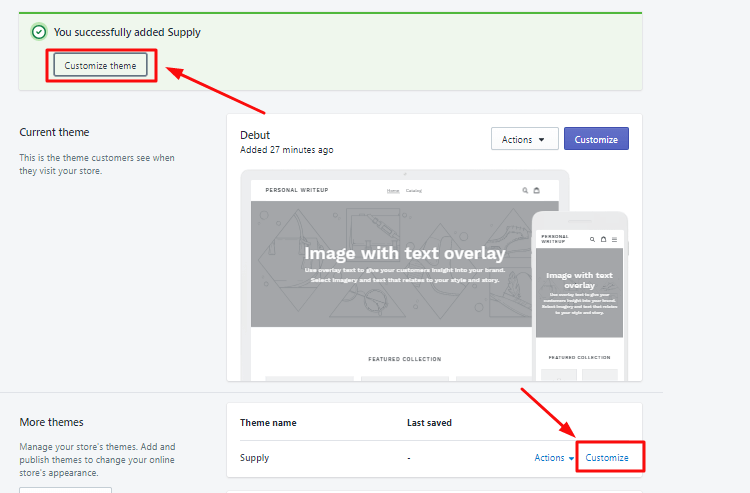
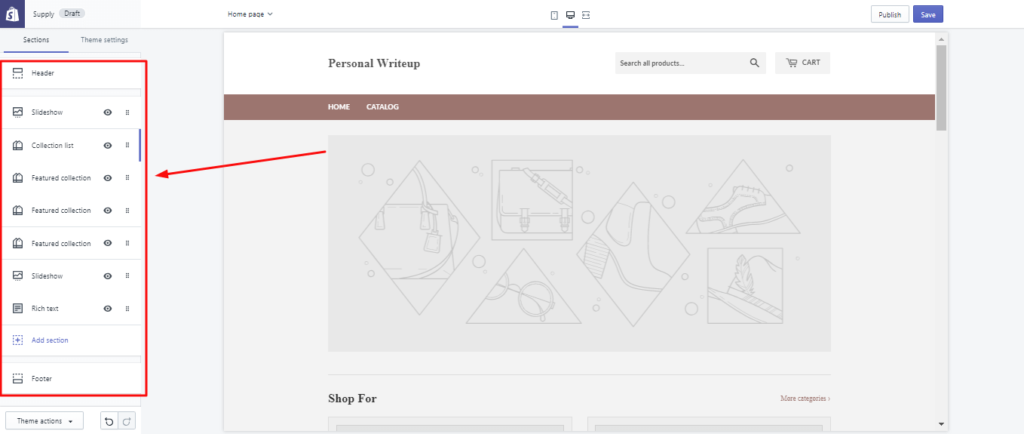
You would come to the page where you can customize your theme page.
Setup the logo image in the header, add a collection, slideshow images, text, and footer.
Select the header option and add a logo image.
You can also any announcement on the top of your page by clicking tick on the announcement bar.
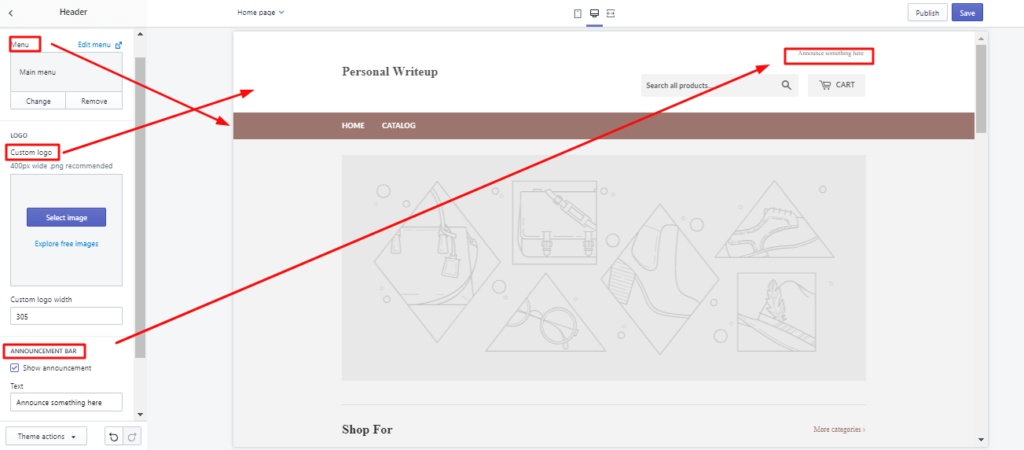
Add your logo by just uploading it from your computer.
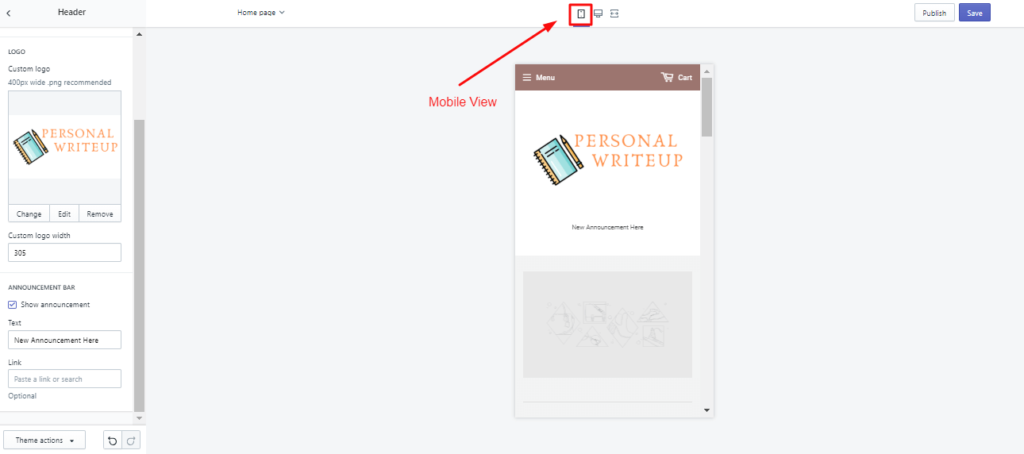
You can also check the mobile view of your store by clicking the option on the top.
Come back to the theme, now select slideshow to add pictures for your store.
You have the option to upload the picture by yourself or you can explore free Shopify images.
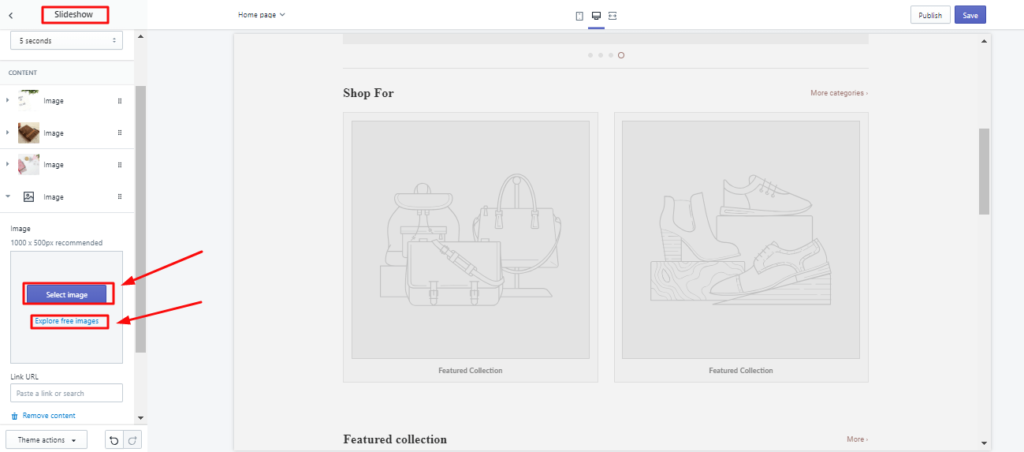
After setting up your slideshow, click ‘publish’ to make it your custom theme.
Don’t worry it will not make it available for the general public.
Now you have installed a customized theme for your store.
However, there are further theme customizations for your store that I will tell later.
Firstly, let’s do some more important such as; adding the product to your store.
To do so, you had better install Oberlo in your store for the products.
How to Install Oberlo in Shopify
What is Oberlo?
Oberlo is an app or tool that you can integrate into your Shopify store to perform dropshipping functions.
It let you find dropshipping products from Aliexpress, add them to your Shopify store, and ship them directly to your customers.
Is Oberlo free with Shopify?
Yes, it is a 100% free App for beginners. You will only have to pay once you start doing transactions with your customer, and until that time, you will not mind paying it.
The major significance of Oberlo is that it semi-automated your dropshipping functions.
The dropshipping functions that include buying from supplier, fulfillment, and shipping it to your customers, Oberlo semi-automated all these functions for you.
That makes it much easier to manage your store in an effective way to scale up your business to achieve higher profits.
Let’s see how to install Oberlo in your store.
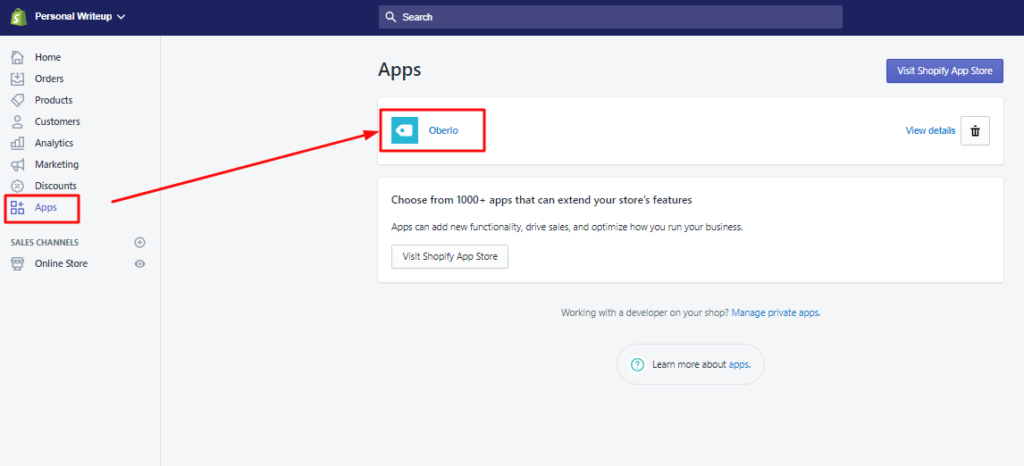
Come to the dashboard of your Shopify store dashboard go to the menu on the left and select ‘Apps’.
On the App page, click ‘visit Shopify app store’ and search ‘Oberlo’ in the app store.
You will find Oberlo suggestion on the app page, so you do not need to search for Oberlo in the Shopify app store.
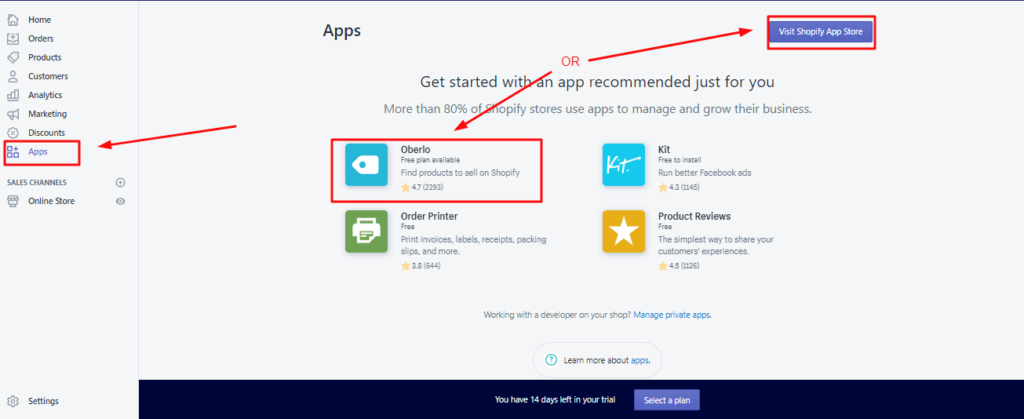
If Oberlo does not show in suggestions, just search ‘Oberlo’ in the search bar and you will find the App Oberlo.
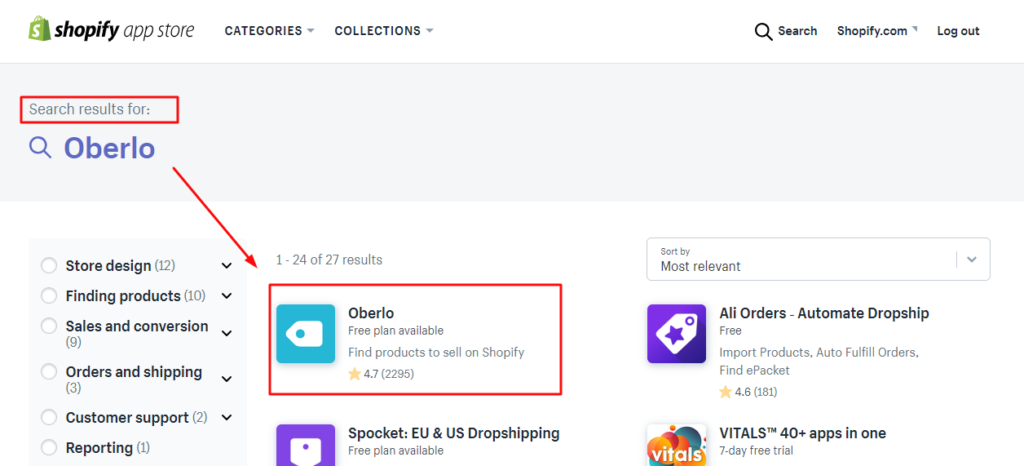
Click Oberlo, you will reach to Oberlo page then click the option of ‘Install App’.
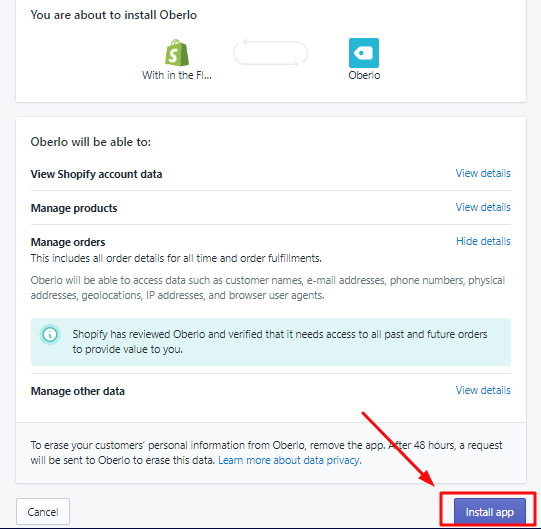
That is it; you have integrated Oberlo in your Shopify dropshipping store.
How to Add Product from Oberlo Chrome Extension
You can also add products with the Oberlo chrome extension. It is the easiest way to add products to your Shopify dropshipping store.
To use this extension, you need to have a Google Chrome browser.
Here is how you can add products to your Shopify store from Oberlo Chrome Extension.
Go to Chrome Web Store and search Oberlo in the search bar.
Select Oberlo app and click ‘Add to Chrome’
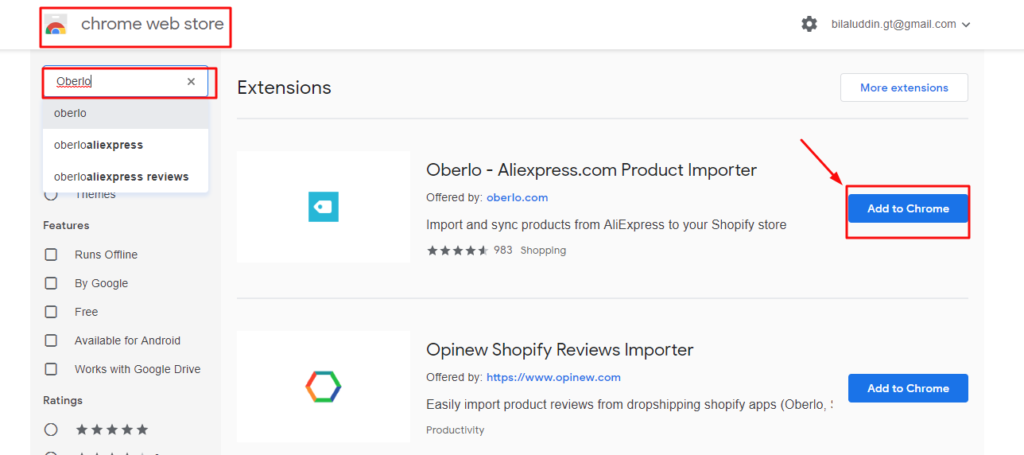
Click ‘turn on sync’ and you will have Oberlo extension installed in your browser.
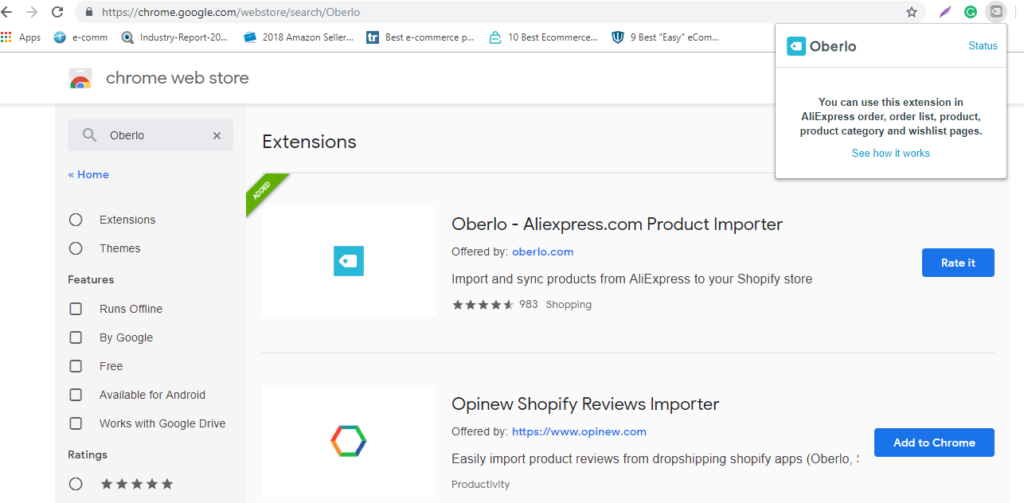
Oberlo Chrome extension has been installed.
Now here is how to use it to add products.
Go to Aliexpress.com write the product keyword in the search bar that you want to add in your store.
Select the product and just click on Oberlo Chrome Extension.
It will give the option of ‘Add to Import List’
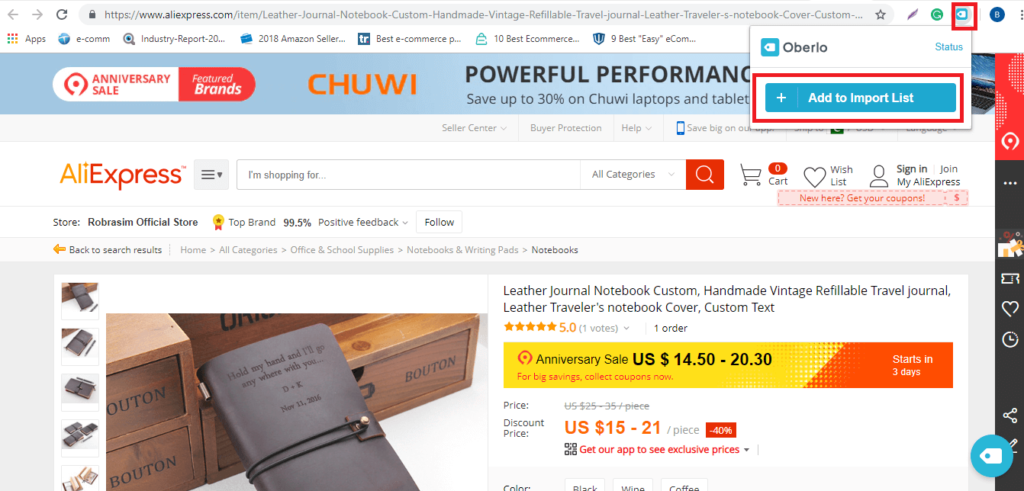
That’s it you have successfully added the product in your Shopify import list with Oberlo chrome extension.
As I searched for leather journal, I just went to the product page and clicked Oberlo chrome extension > Add to import list.
How to Add Products from Oberlo App
If you do not want to use Oberlo Chrome Extension, you can also add the product to your store with Oberlo App.
Go to Oberlo homepage, click ‘search product’ on the left sidebar or click ‘find product’ on Oberlo homepage.
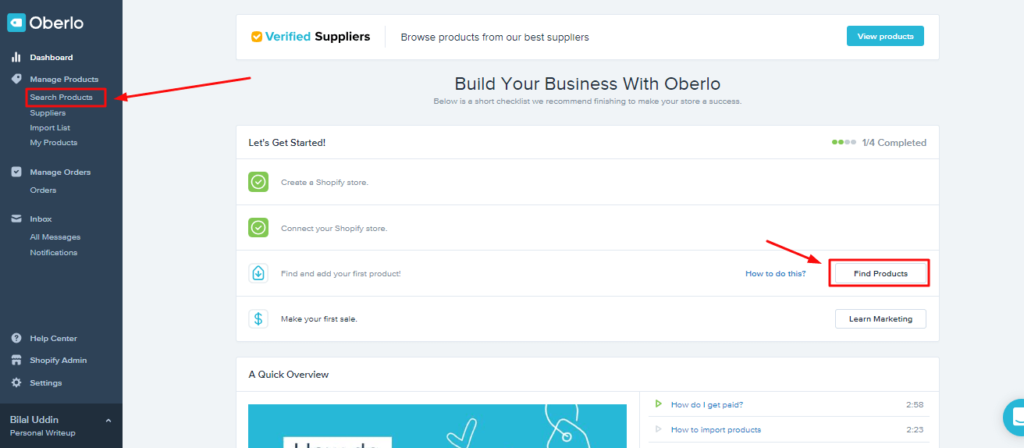
You will land to the page product search where you can find a product by clicking the keyword in the search bar.
As, I have created the store to sell notepad, notebook, and journals.
So, I am searching with the keyword ‘Leather Journal’.
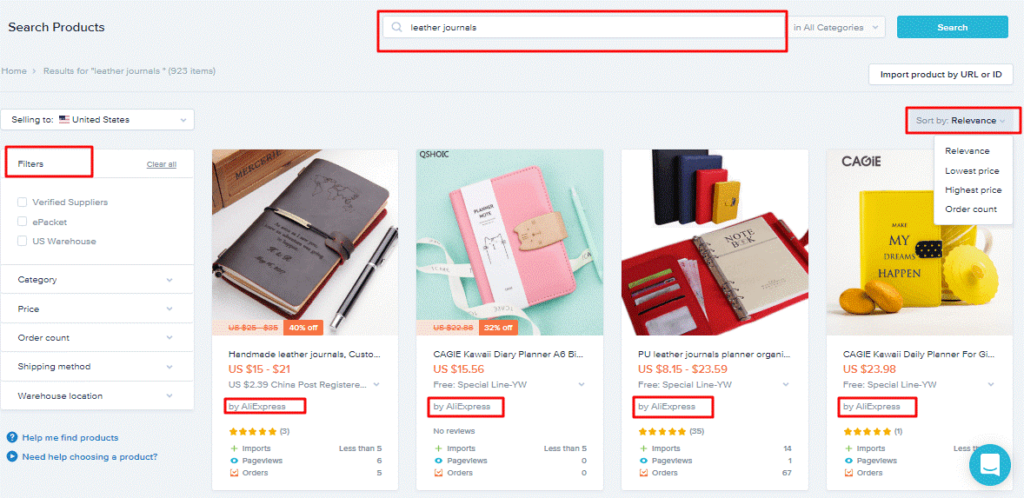
It showed all the suppliers selling leather journal, you can also choose a supplier other than Aliexpress.
However, Aliexpress is the most sought after supplier’s place so I am going to pick up products from Aliexpress for my dropshipping.
You can search the result by setting up the relevancy (lowest price or higher price) and also can add the filter to show you relevant results.
Once you select the product, click on it and you will have complete information about the product.
You can also see the product on Aliexpress.
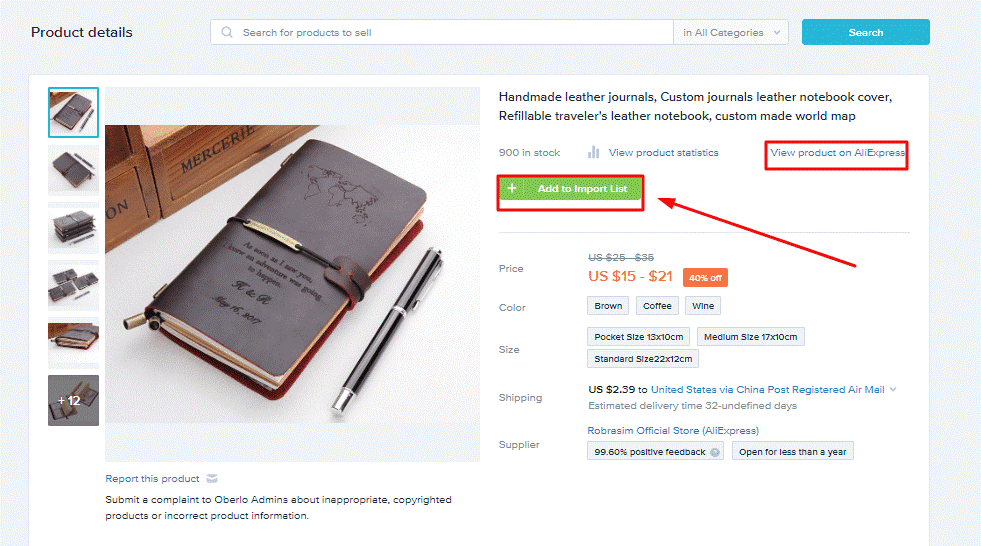
Therefore, I added two product in import one is leather journal notebook and other is a daily planner journal.
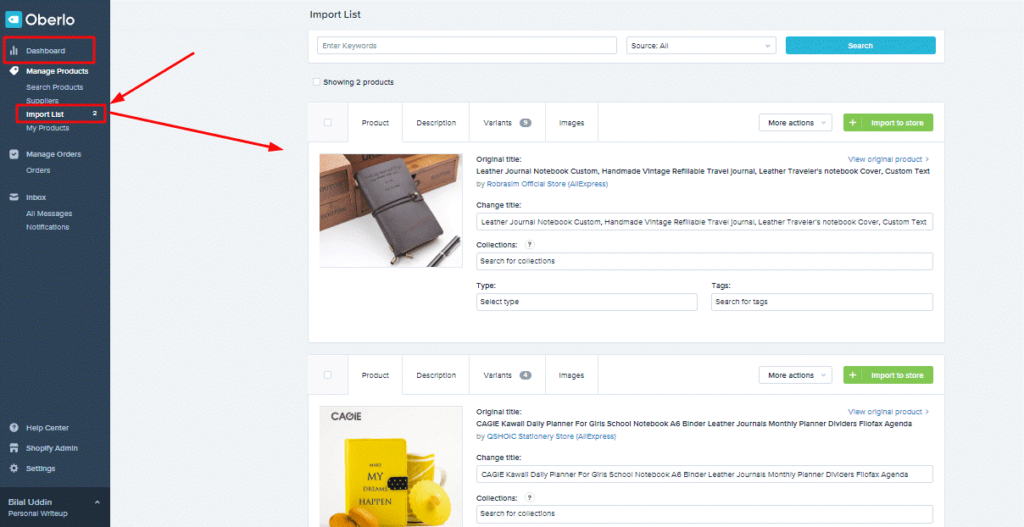
To see the imported product – Go to the Oberlo dashboard and click the ‘import list’.
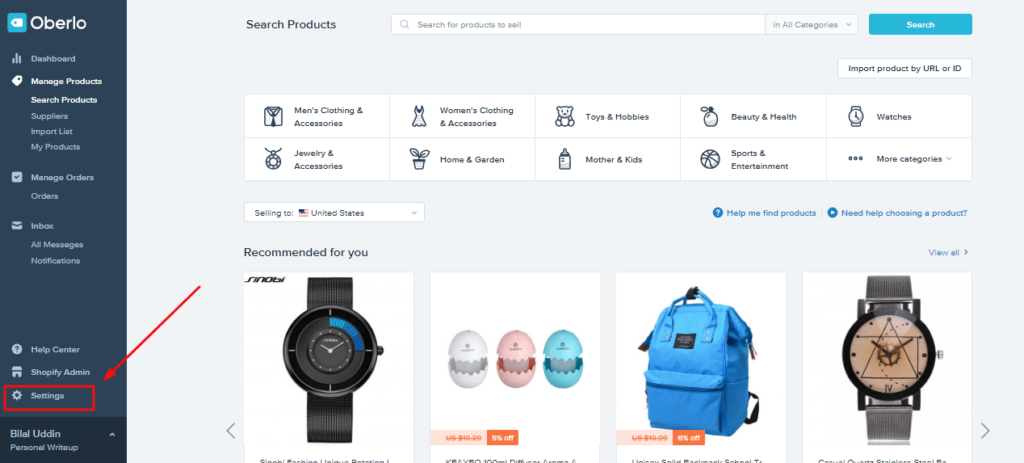
However, the job is not done yet. Now you need to go to the setting to update Oberlo setting to make your store semi-automated.
How to Semi-Automate Shopify Store with Oberlo
On Oberlo page (Apps -> Oberlo), go to the bottom of the left sidebar you will find settings options.
Click the setting option.
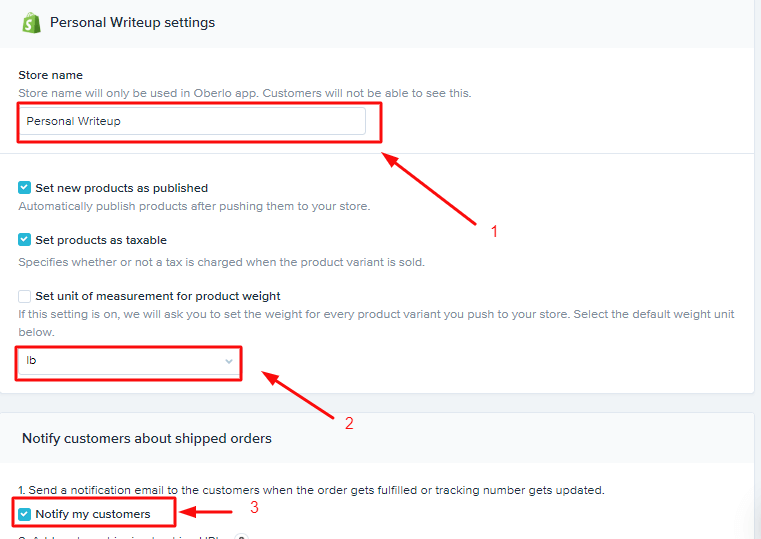
- Enter your store name in the option.
- Come down and set your default weight unit to pound (lb.), if it was in Kg or grams. Lb. is the standard unit for weight worldwide.
- Go down in the ‘Notify customer’ section and tick ‘notify my customer’ so that customer get a notification once the order is fulfilled.
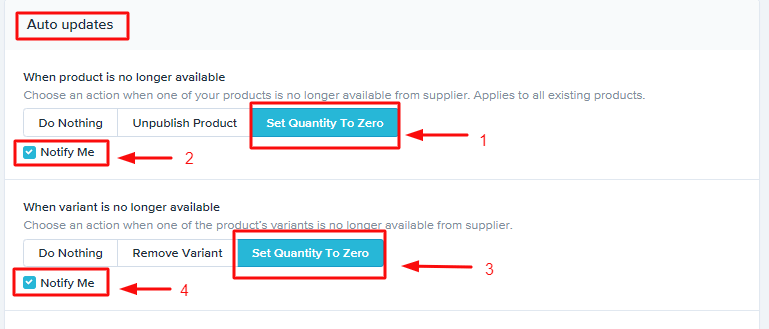
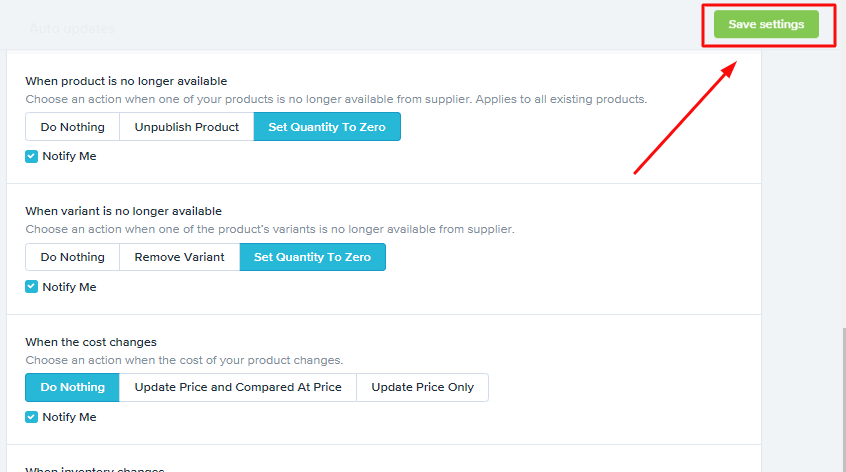
Scroll down and reach find auto-update. This is very important, it will notify you about every import alteration in your store that you need to know.
Tick ‘notify me’ and change the setting to ‘Set quantity to zero’ when product or variant is not available.
You will set the price by comparing it with the cost so change the setting to ‘Do nothing’ and tick ‘notify me’.
For inventory changes, select ‘Update Automatically’
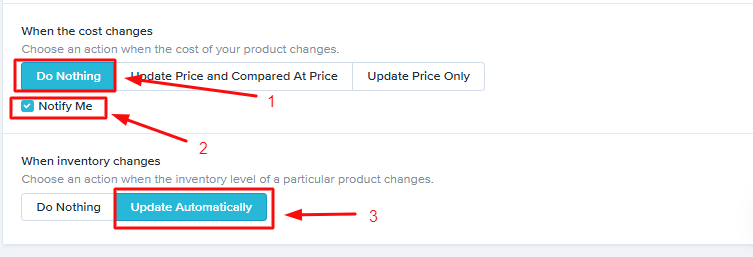
Lastly, click ‘save setting’.
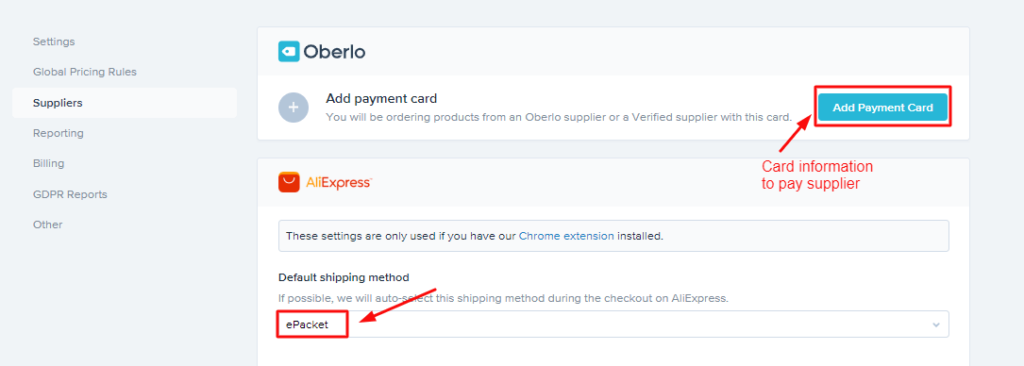
Now, scroll up and click the option ‘Suppliers’
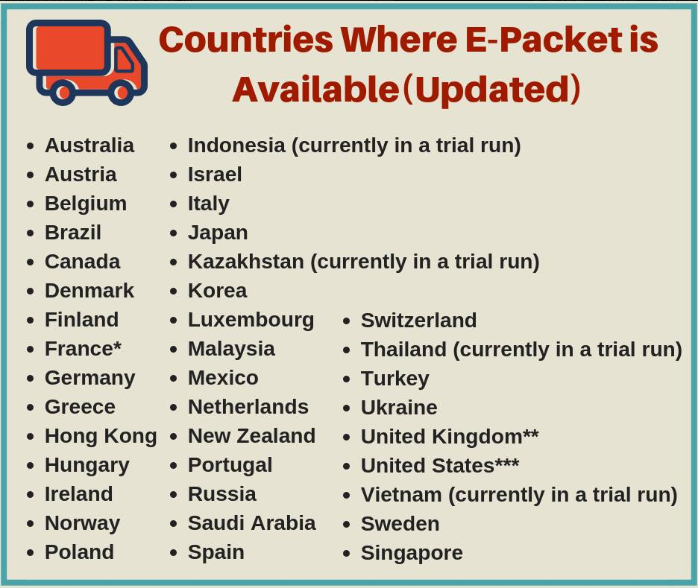
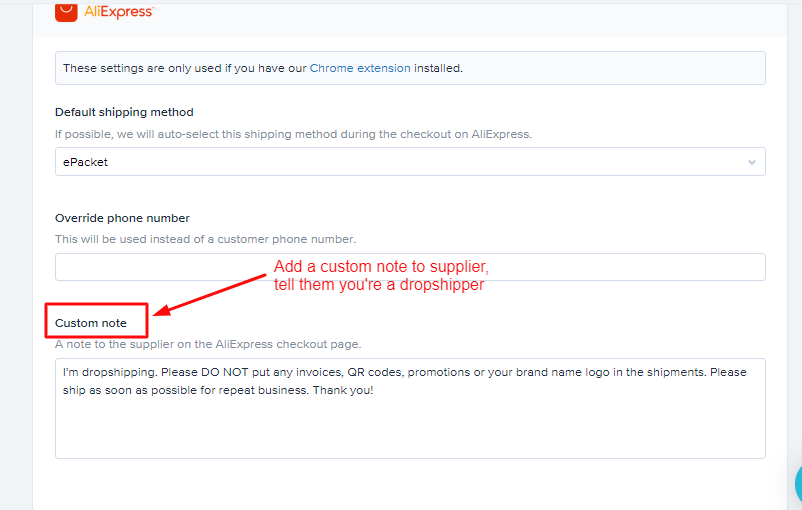
Choose your default shipping to ‘ePacket’.
If you do not know what ePacket shipment is; here is a brief definition.
EPacket shipping is a contract between the US government and the Chinese government made for the progression of trade globally.
With ePacket, the shipment will be made in cheap rate and in a comparatively faster time.
Here is the list of the countries where ePacket shipping is available.
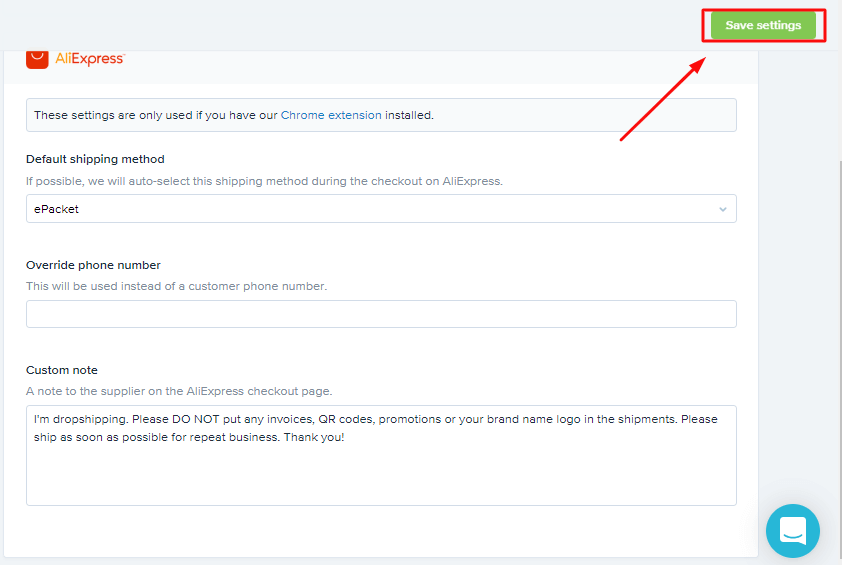
Change default-shipping method to ‘ePacket’ and add card information to pay the suppliers.
Scroll down and write a custom note to your supplier.
Tell the supplier that you are a dropshipper so they do not put any of their logo or brand name in the products.
After doing these steps, click ‘save setting’ on the top right.
You have made your store semi-automated with Oberlo.
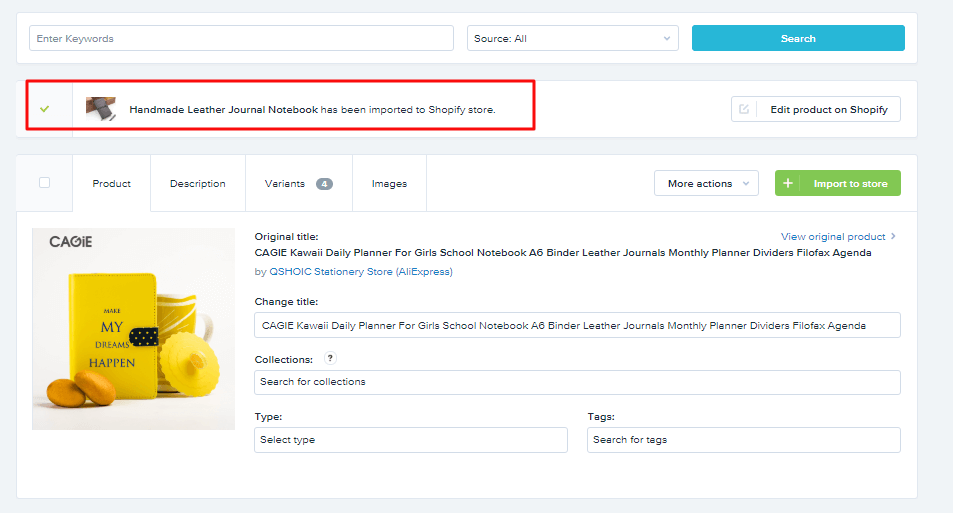
How to Edit Listing Product on Shopify Store
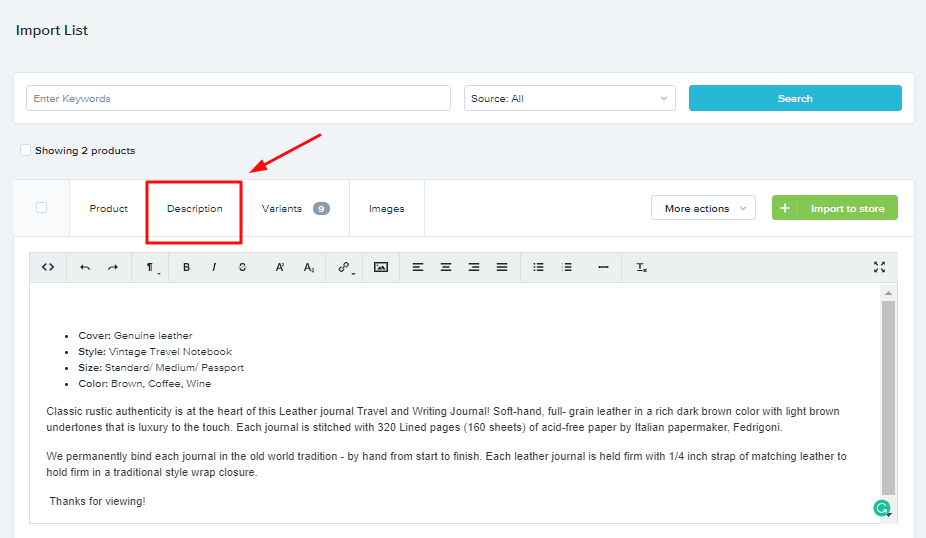
The product that you import comes with the title and description exact as suppliers’; you need to customize it to make it your store’s product.
Just click to the product on your import list you will land to the page of product editing.
First, change the title and set it as per your preference.
Write product description, it is better to write a description of about 150-300 words so the keyword density can increase in the content.
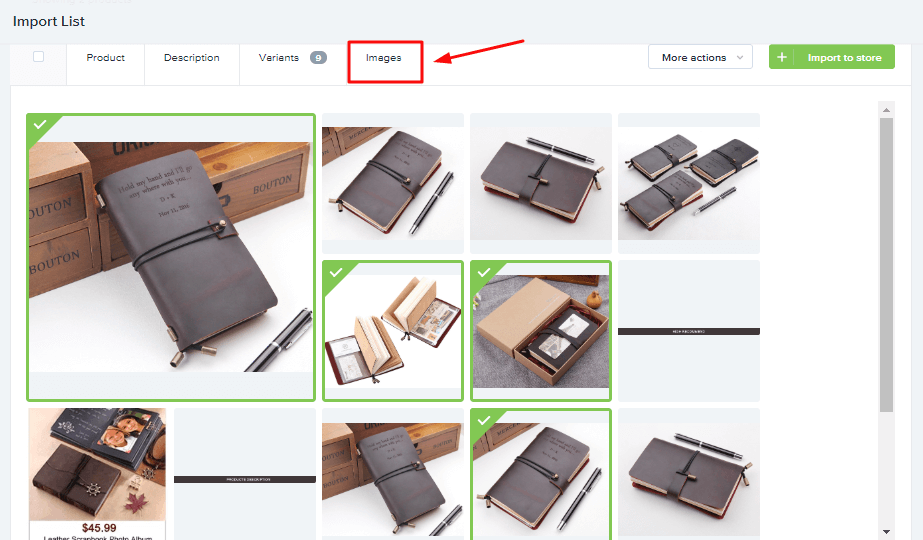
Select the images that you want to show in your store.
Choose variants and their prices.
Variants are the product in different sizes, colors, and shapes. You can add or remove the variant and set prices here.
Oberlo also gives a suggested price in the currency your store is based.
As I have set up my store on Hong Kong credentials. Therefore, it is showing me prices in Hong Kong Dollar.

After editing, click the ‘import to store’, then the product will be imported to your Shopify store.
Do the same thing for all products.
So, do you have the product to sell in your store?
Great, now it is the time to add categories/collection of your products.
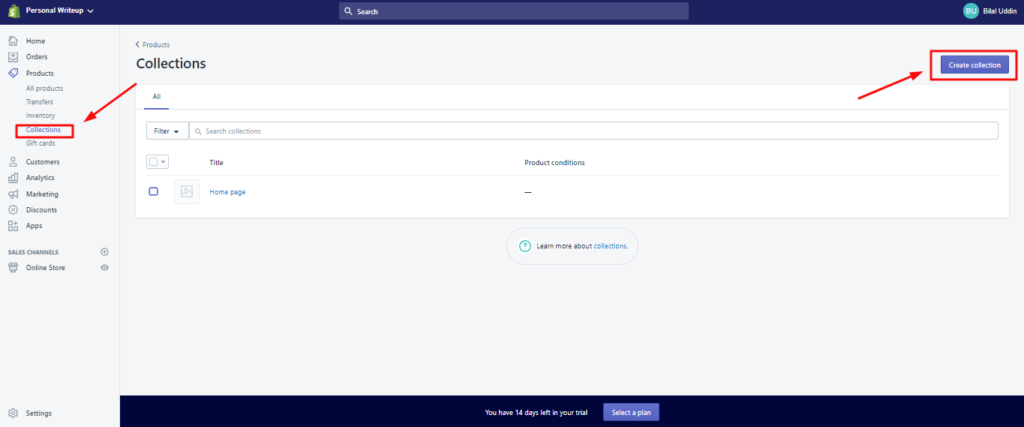
How to Create Product Collection on Shopify Store
Product collection means to create product categories.
Go to Shopify dashboard, scroll down to ‘product’ option and click ‘Collection – Create Collection’.
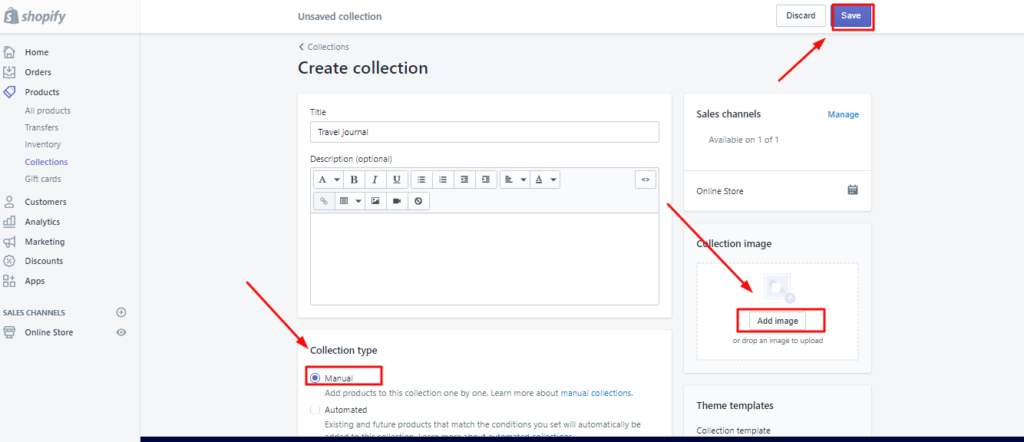
So, for my type of store, I am going to make categories around notebook and journals.
I make my first collection on ‘travel journal’ and write the title name accordingly.
Set the collection image and change the collection type to ‘manual’.
Scroll down to product > Click browse > Select products to add in your collection.
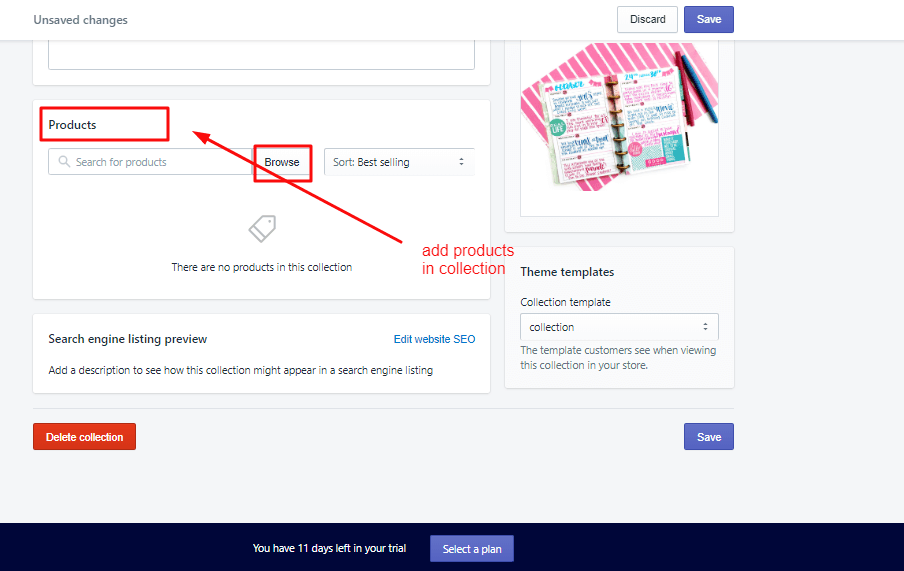

Click ‘Add’ and the product will be added in your collection.
How to Add Sales/Discounts on Your Products
Go to your Shopify and click all product.
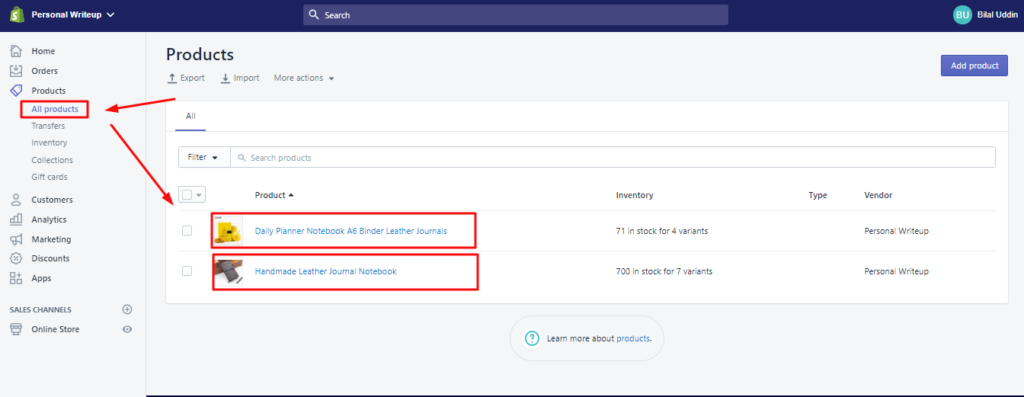
All of your product will show on the page. Click the product for editing.
I am showing a different product this time to show you how you can further edit your product and put sales on items.
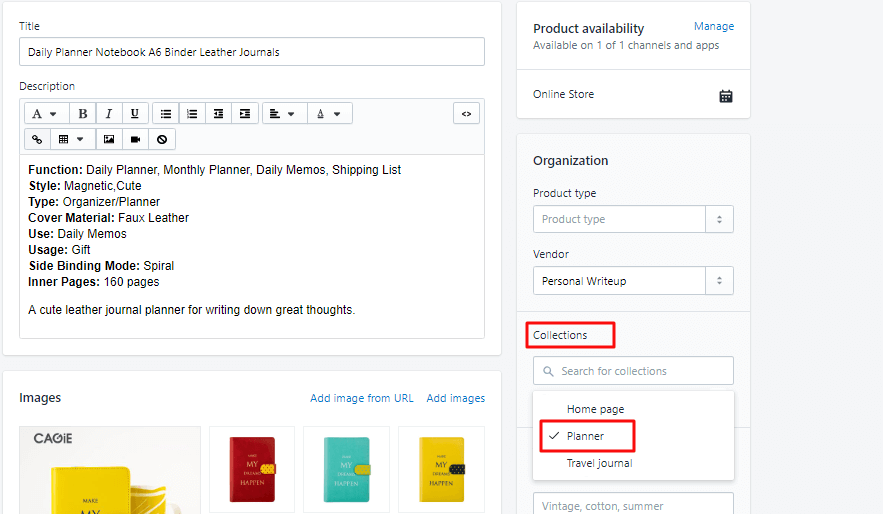
Set the customize title and add the product in any of the collection that you have made.
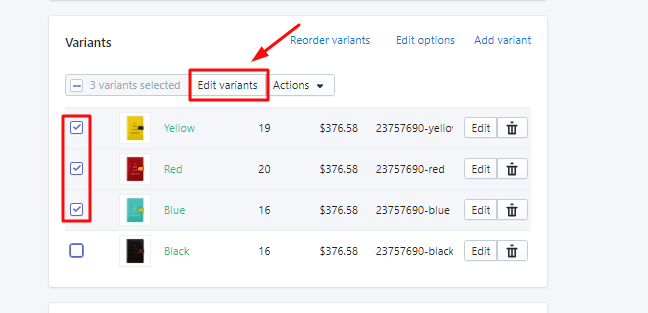
Scroll down; you will come to the option of variant, select variants that you want to put on sales and click ‘edit variant’.
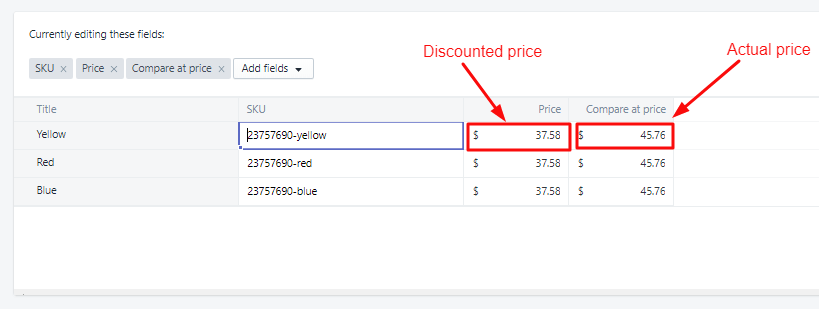
You will have two pricing option ‘compare price’ – that shows the actual price of the product, and price – that shows the discounted price.
Once you add a discount now it is time to add free shipping options.
Online buyer loves free shipping.
Well, it does not mean it going to cost you more.
You just have to set up the price in a way that it will not affect your profit.
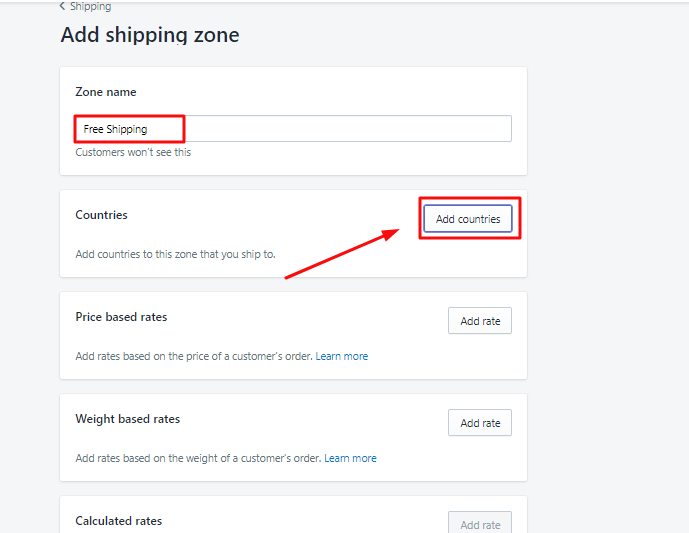
How to Add Free Shipping Option in Your Shopify Store
To add free shipping option,
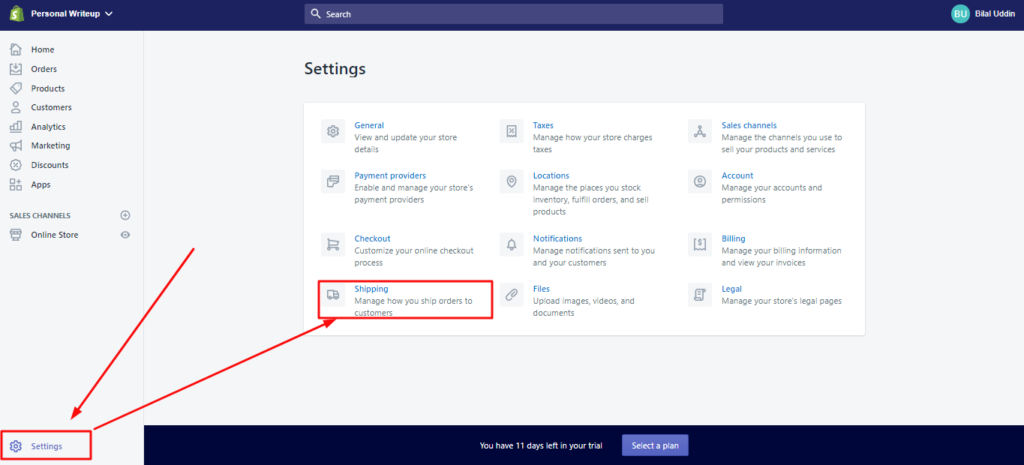
Go Shopify dashboard and scroll down, at the bottom left click ‘setting’ option.
In setting option, click ‘shipping’.
You will see two options one is shipping from (your address) and another one is worldwide shipping.
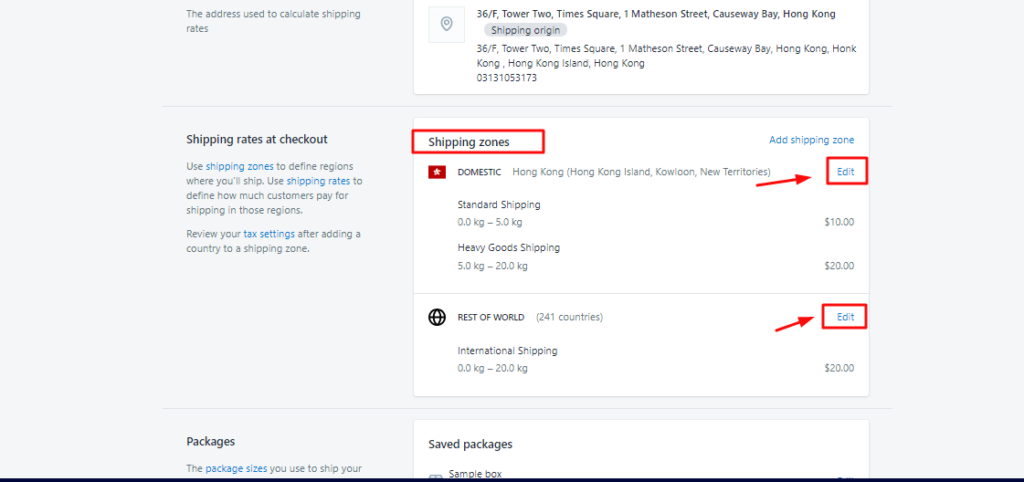
You have to delete both options.
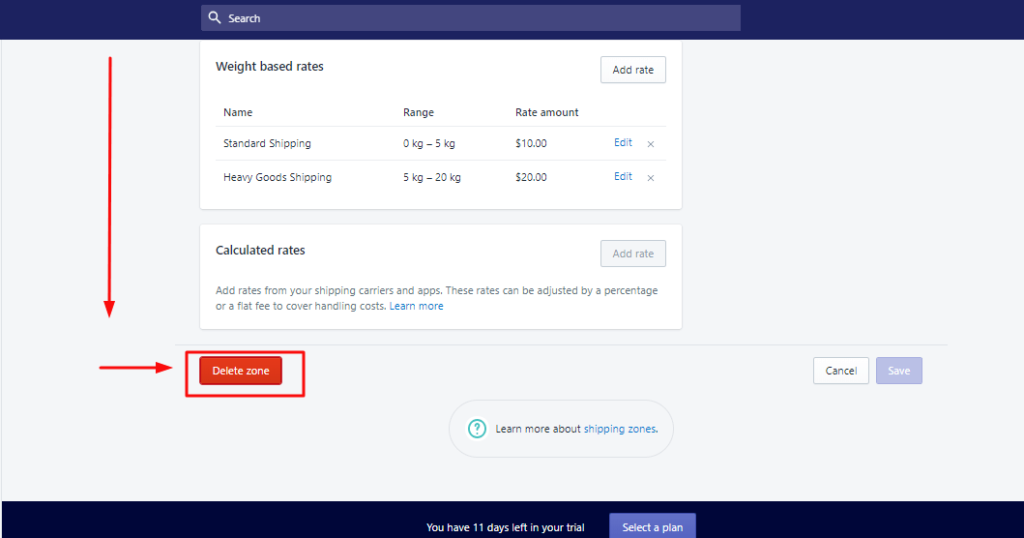
Just go to the edit scroll down and click ‘delete zone‘.
After deleting both options, go up to the shipping zone.
Click ‘add shipping zone’
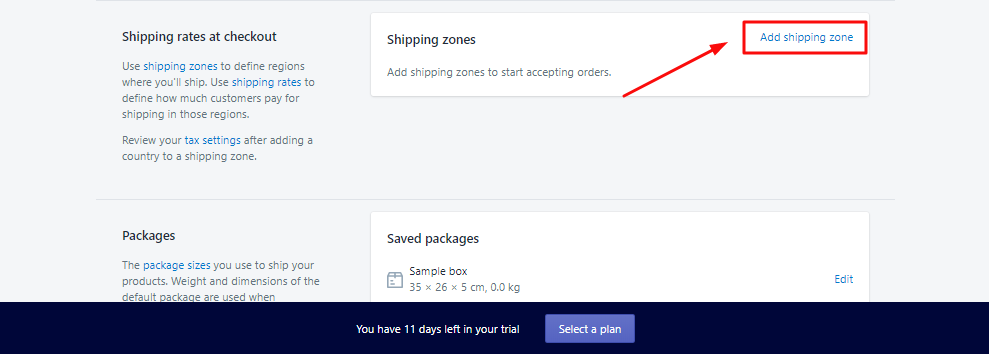
Write zone name whatever you want, it actually does not matter.
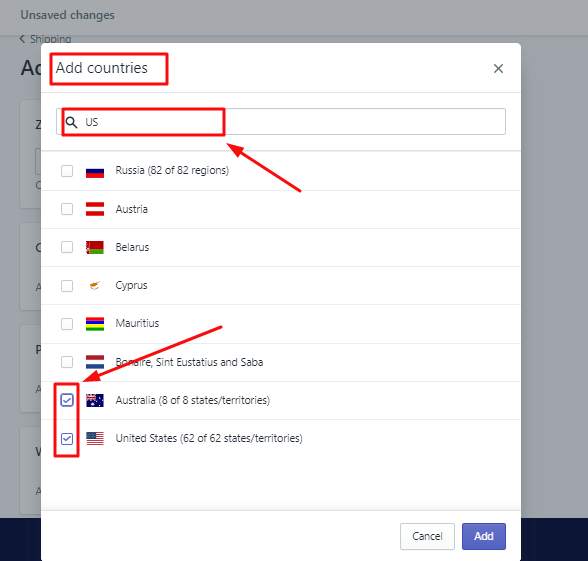
Come down and select add countries option. The places where you want to sell your items.
Before selecting the countries, make sure that those countries have a shipping option.
Write the name of the country on the search bar and click tick on the countries you want to add.
Click ‘add’ after selecting the countries.
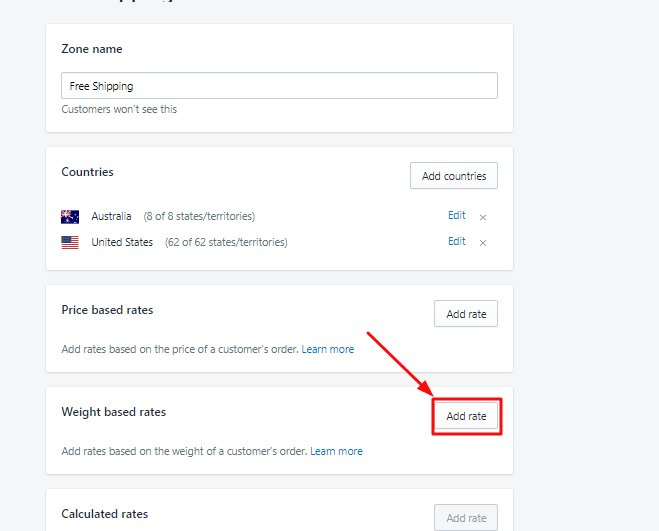
Come down and click to ‘add weight based rate’ option.
Write name, tick the free shipping option and click done.
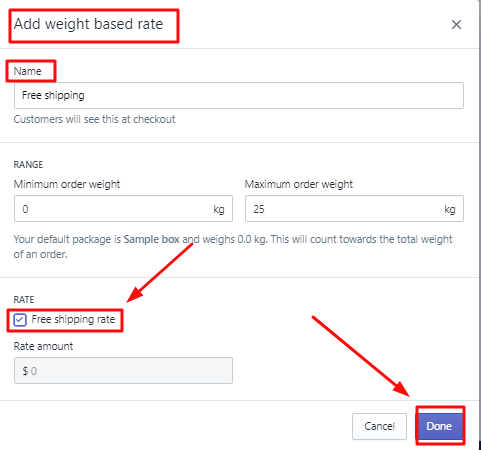
Scroll down and click save.
That’s it you have successfully set up the free shipping option.
How to Setup Payment Options
Dropshipper outside of the USA, can use the Shopify payment option (Shopify Payments) and have their currency set to USD.
As most of the Shopify dropshipper target the customers of the US – as it has more dropshipping facilities and opportunities – the payment setting will be created on that priority.
However, not all countries can use Shopify payments now; it is only available in some countries yet.
You can see the new update here.
Therefore, if your country is not available in the list of Shopify Payments, don’t worry you still have PayPal.
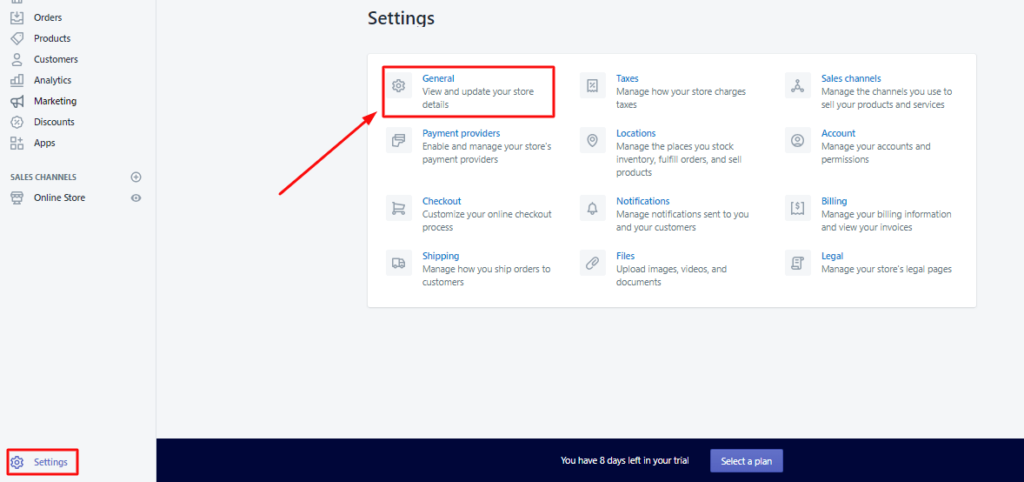
First, go to Shopify dashboard > setting > select general settings.
- Scroll down come to standard and formats change your unit system to ‘imperial system’ so the default weight unit change to ‘pound (lb)’.
- Go down change your store currency format to US dollar ($).

‘Save’ the changes.
Now go back to settings and select ‘payment provider’.
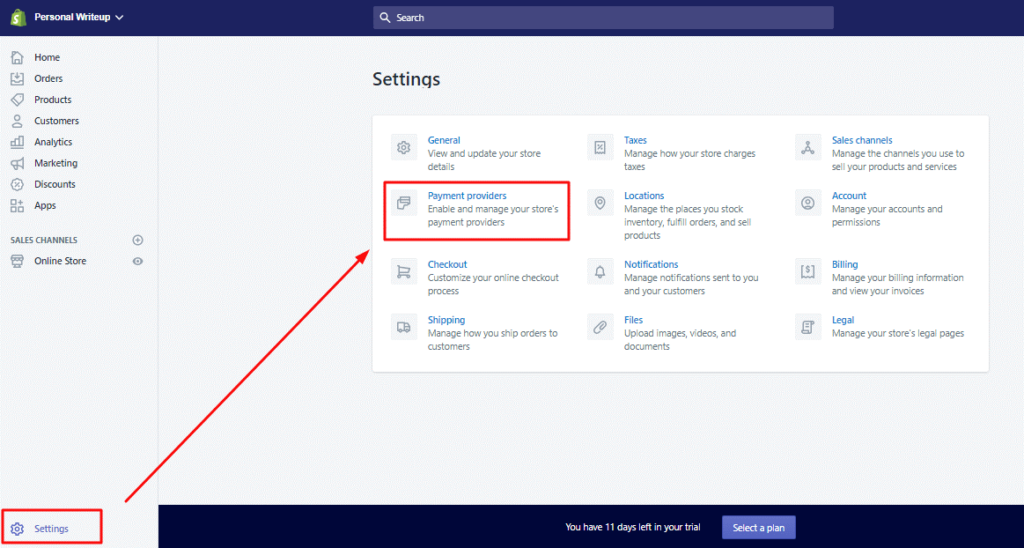
If your country belongs to the countries in the updated Shopify list then the Shopify Payments option would already include.
As my store is operated from Hong Kong, so as you can see the Shopify Payment is already there.
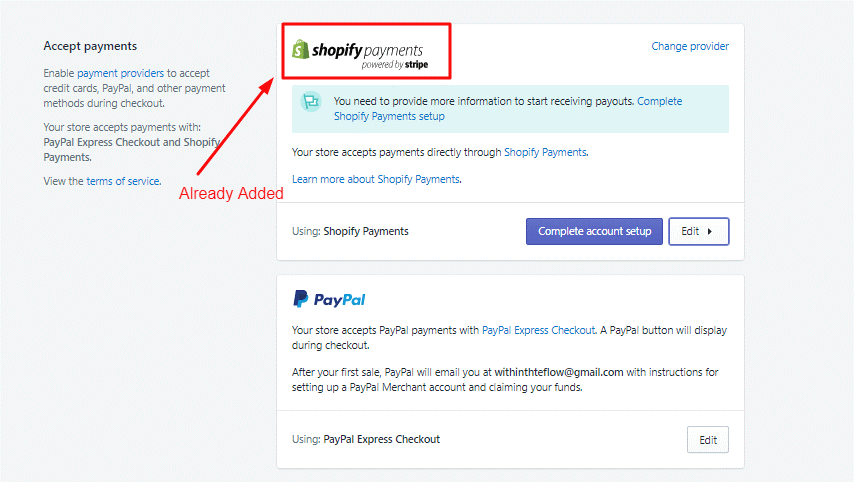
You only need to click ‘Complete Account Setup’ and add accurate details of your bank account.
Set up PayPal
In many countries, PayPal is by default turned on like in my case.
If it is not turned on by default,
Select PayPal method > Click PayPal express checkout button > Click Activate.
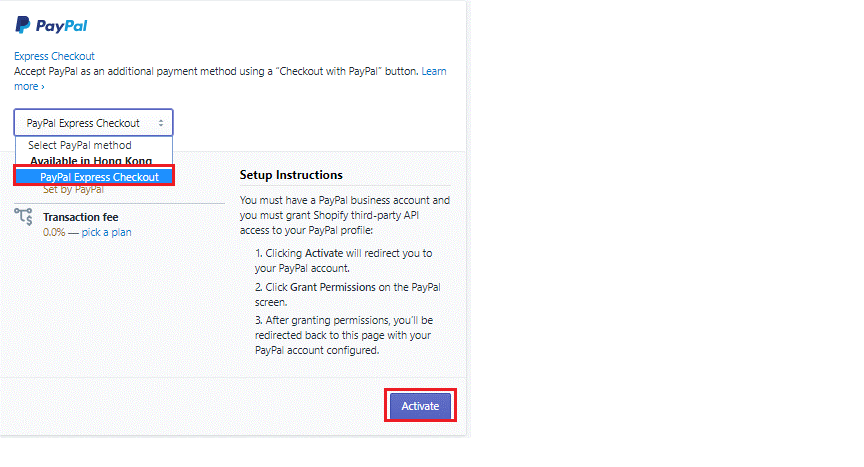
Write your email
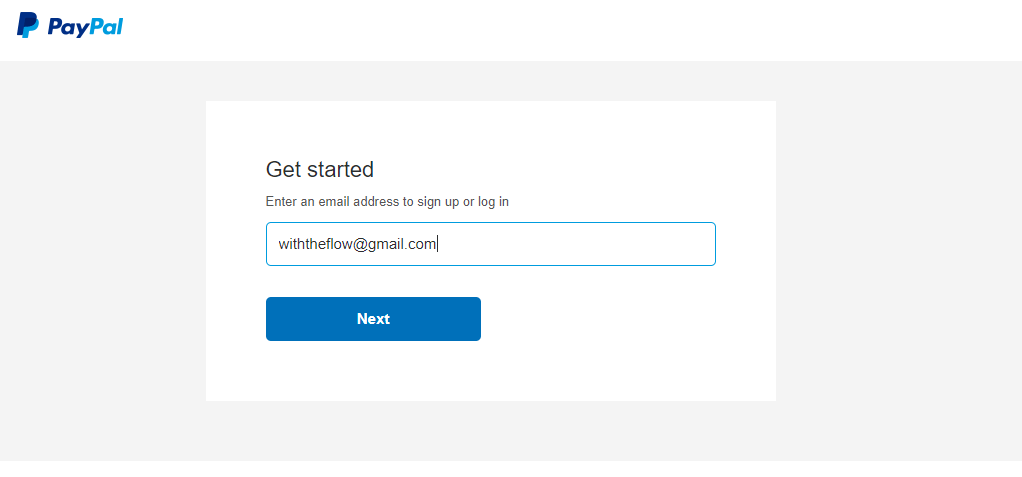
Give your bank information on PayPal and click ‘agree and continue.’
This PayPal instruction is for those who could not use Shopify Payments.
If you already insert your bank information in Shopify Payments, Shopify will only ask your permission to use the information for PayPal.
That’s it you have successfully added the payment methods.
How to Customize Your Shopify Store
After setting up the payment and add products to your store.
Now is the time to focus on some store customization.
To do so, go to Shopify Dashboard > select online store > click ‘customize’.
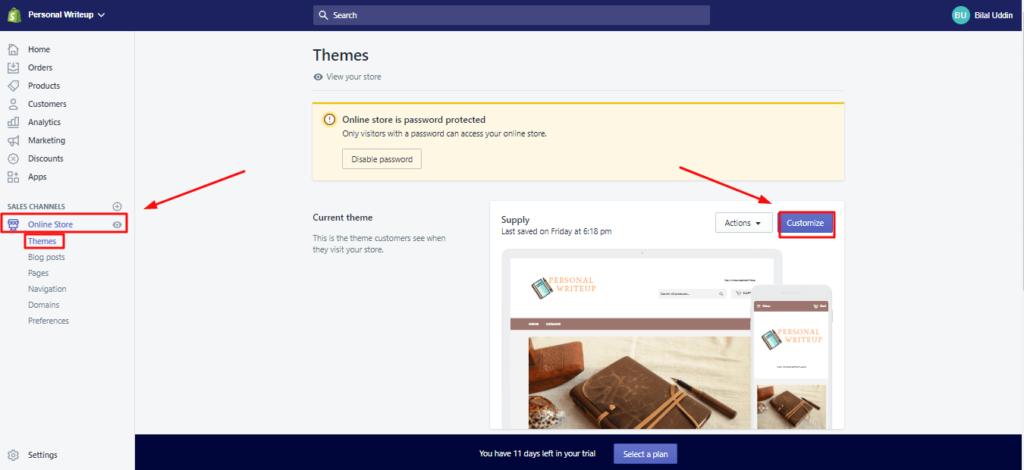
As you can see, I have only setup header and slideshow now it is the time add product collection on the storefront.
Come to the collection and click ‘select collection’.
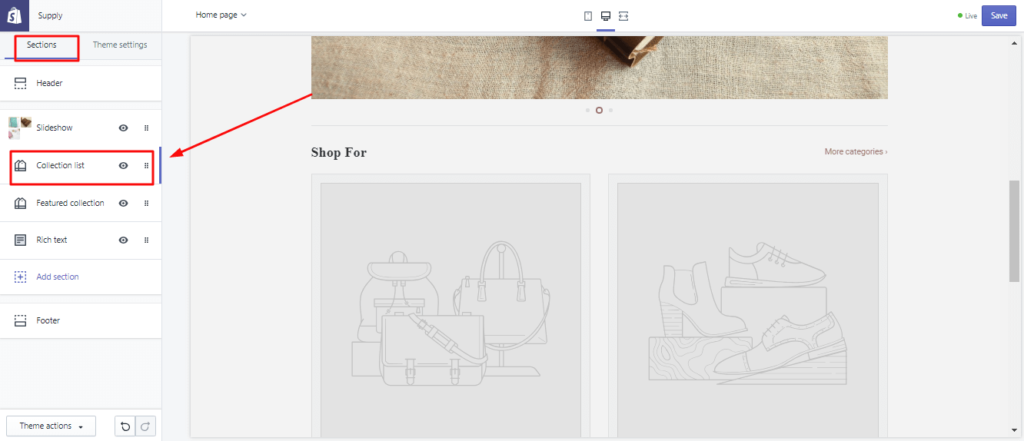
Remember I have already made my products collection.
Once you select collection, it will give you the option to select from already made collection.
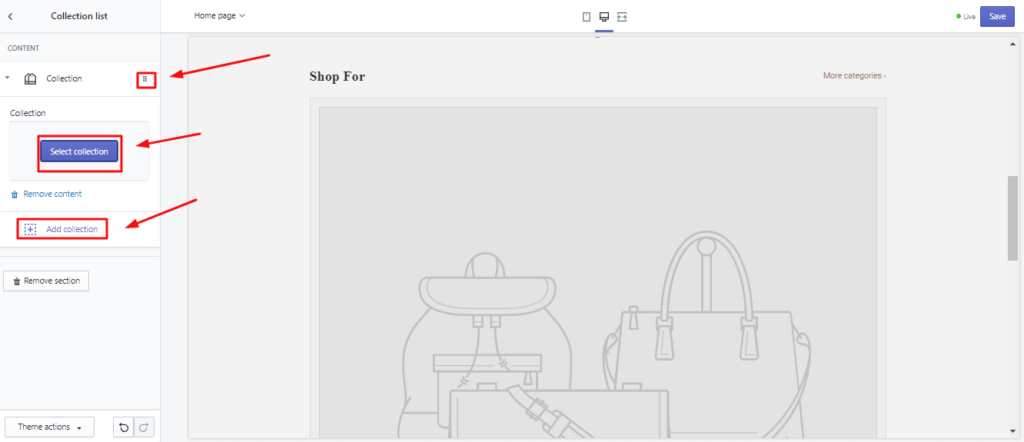
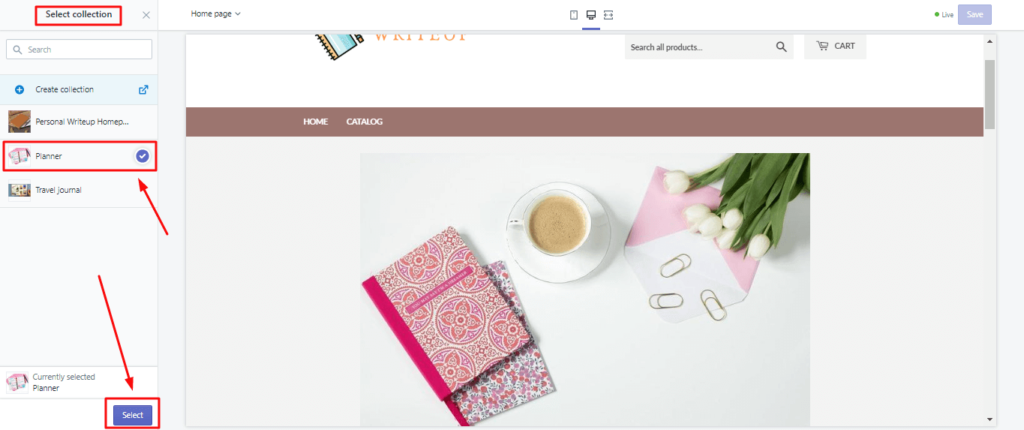
You just to click to the already available collection and click ‘select’ to add it in your store collection.
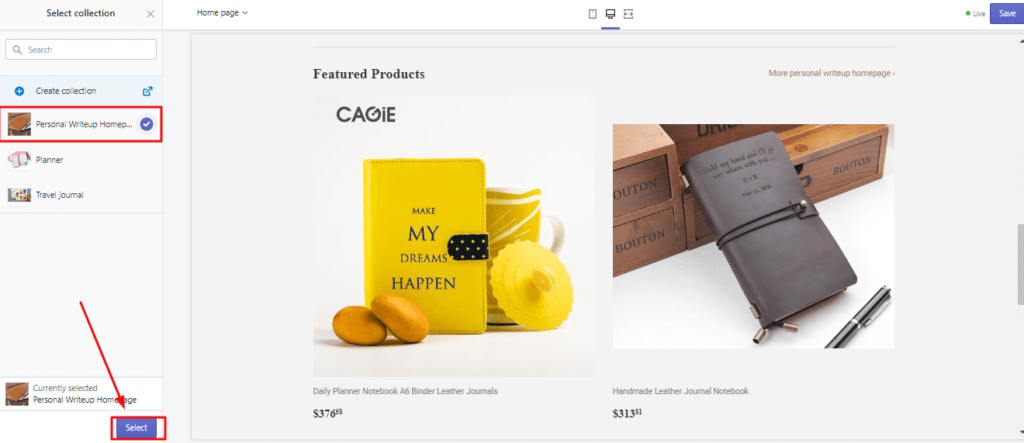
Now come down to featured collection option, you change it is to anything you want.
I have changed it to ‘feature products.’
Here you can select the ‘collection’ and it will show the products of that collection.
I choose the homepage collection as it contains all the product in my store.
Well, actually I have added only two products.
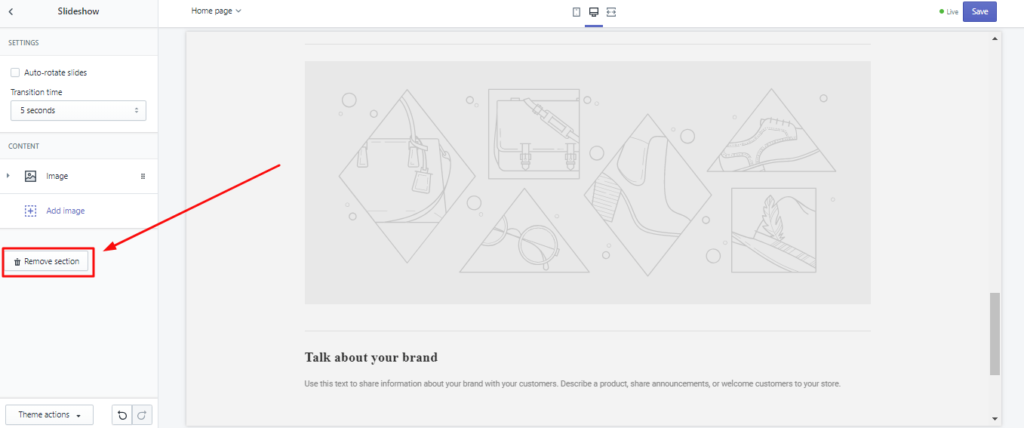
You can also add or remove option you want, as there is again a slideshow option that I do not require.
Like this slideshow option has appaeared again.
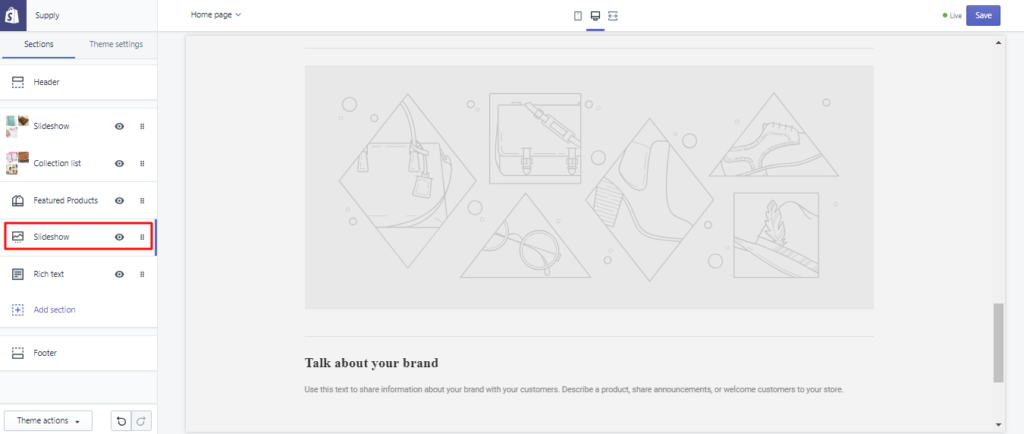
Therefore, I clicked to it and select ‘remove section’.
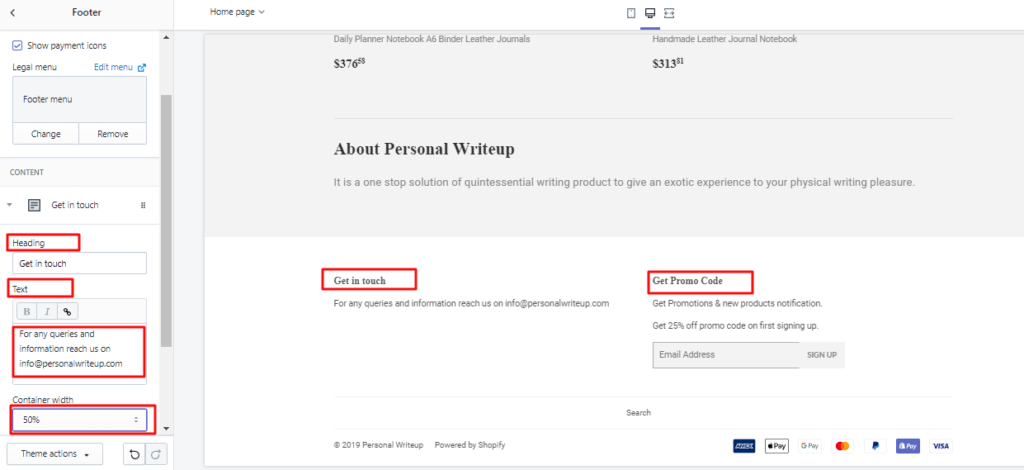
Now there is a rich text and footer option where you can write something about your brand and your contact information.
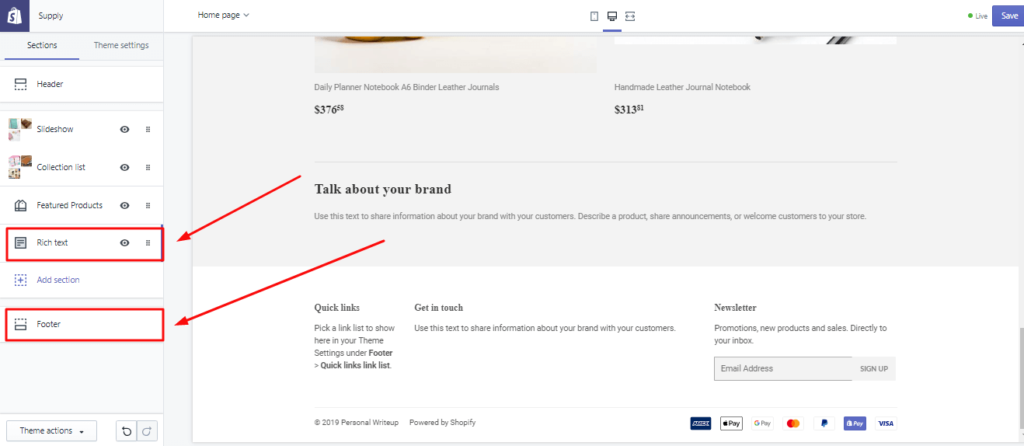
These options depend on the theme that you choose for your product it is up to your preference what option you want to keep or remove.
So, I write a little bit about my brand on rich text and footer for contact information.
Set the container width as per the options you mention in the footer as I have only two option – ‘Get in touch’ and ‘get promo code’ – so I set it up on 50%.
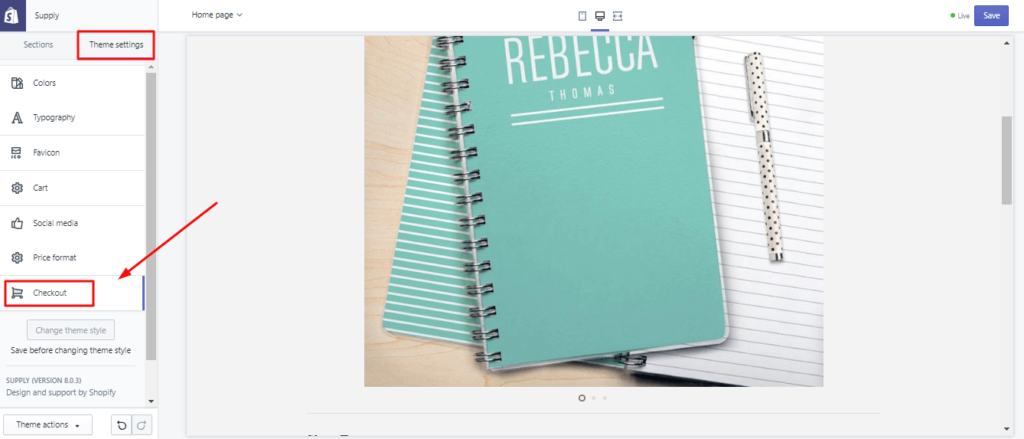
Now come to the theme setting.
Let’s start from the checkout.
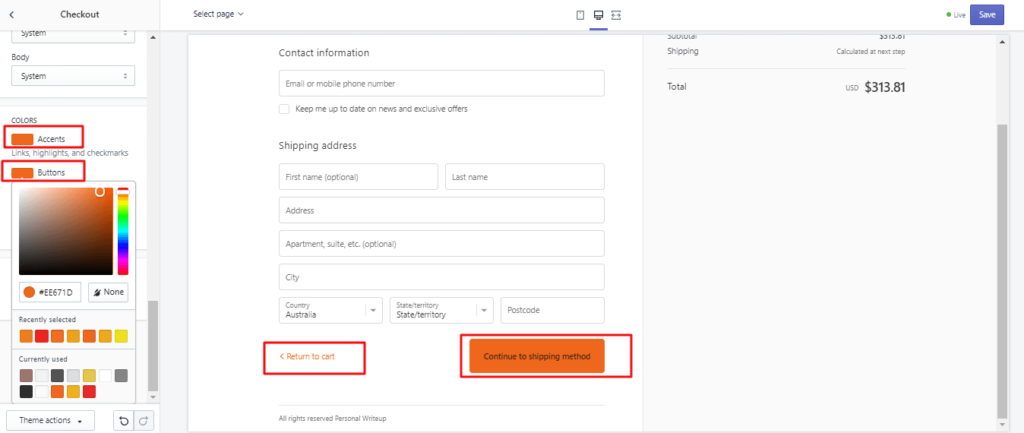
To see the live changes while you edit, add an item in your cart and select cart on top of your page.
Now add logo and select colors of your checkout button.
The colors of the button should align with your logo or product kind.
As I have selected this color as it is somewhat matched with my logo color.
Once you complete your customization, go to the top right corner and click save.
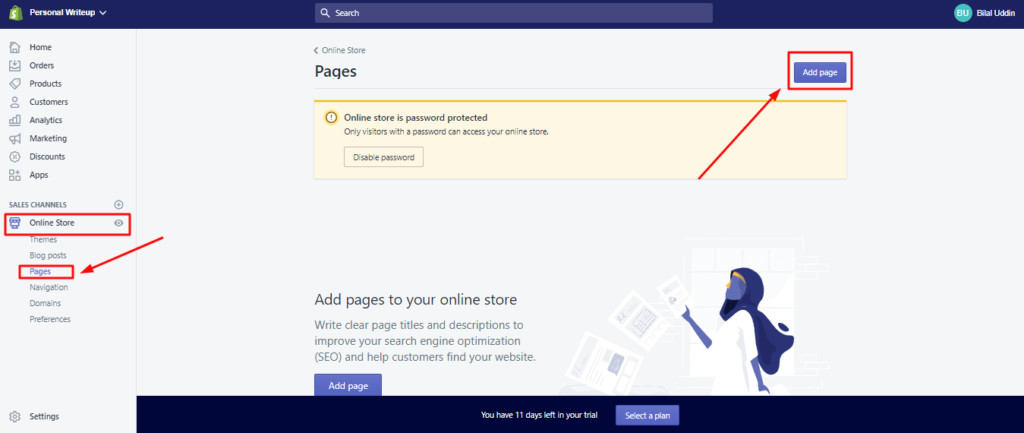
Add Pages on Store
Now your store is almost ready to publish for the audience. However, you can add some pages that you can add. They are optional but very important to show business’ credibility.
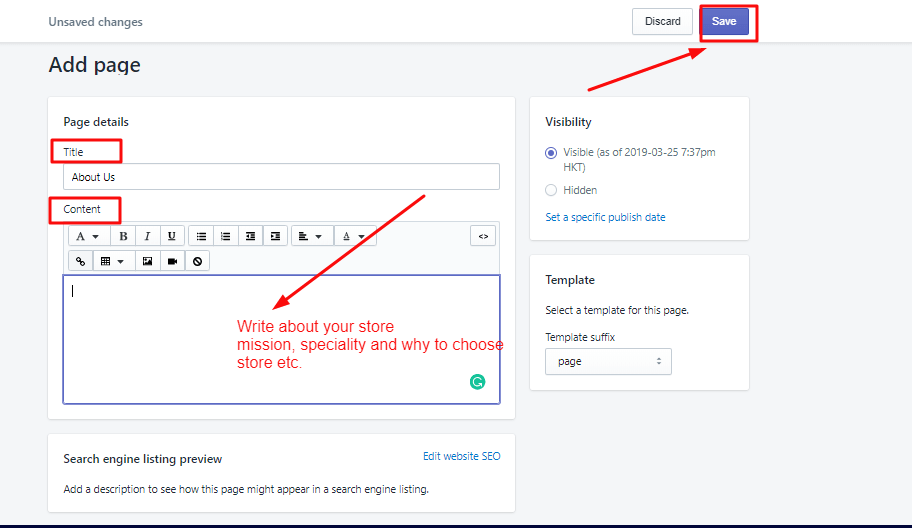
Let say add an ‘About Us’ Page.
Go to Shopify dashboard > click online store > pages > add Page.
Like I have created a Contact Us page and it is super easy.
Just write ‘contact us’ in the title and select page.contact in template suffix.
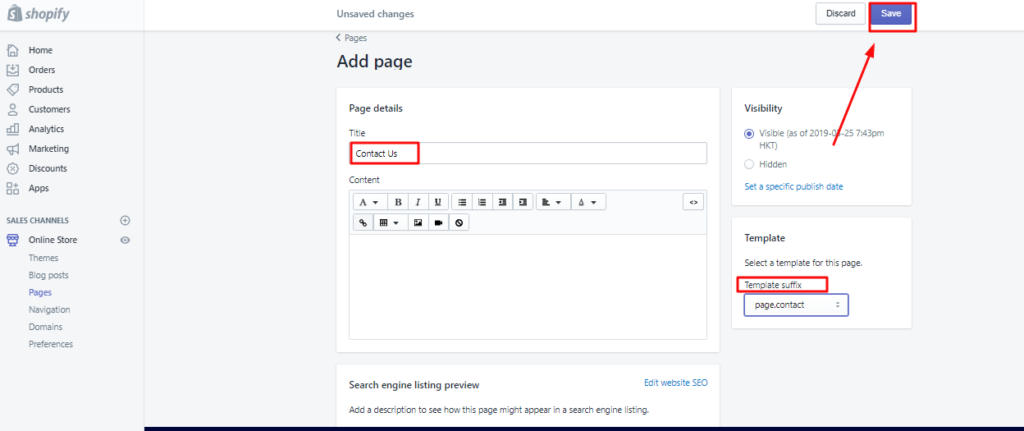
That’s it your contact page has been added.
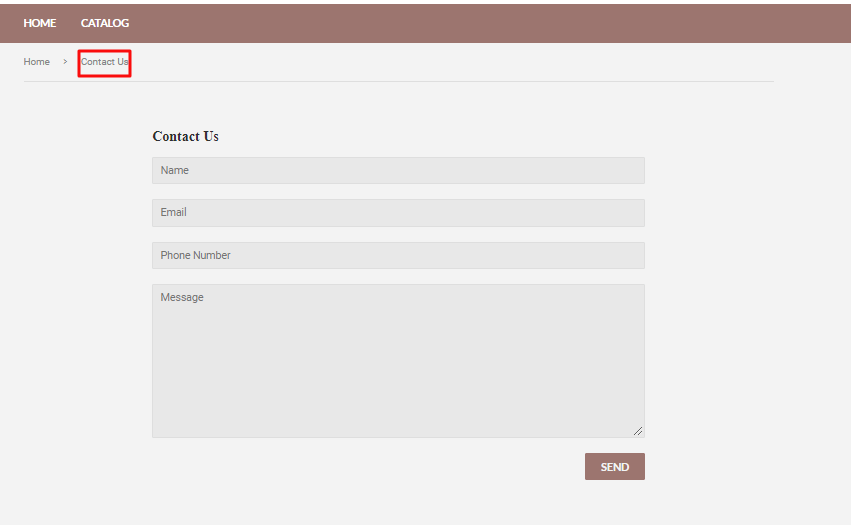
It will look like this,
Click save and add another one if you like.
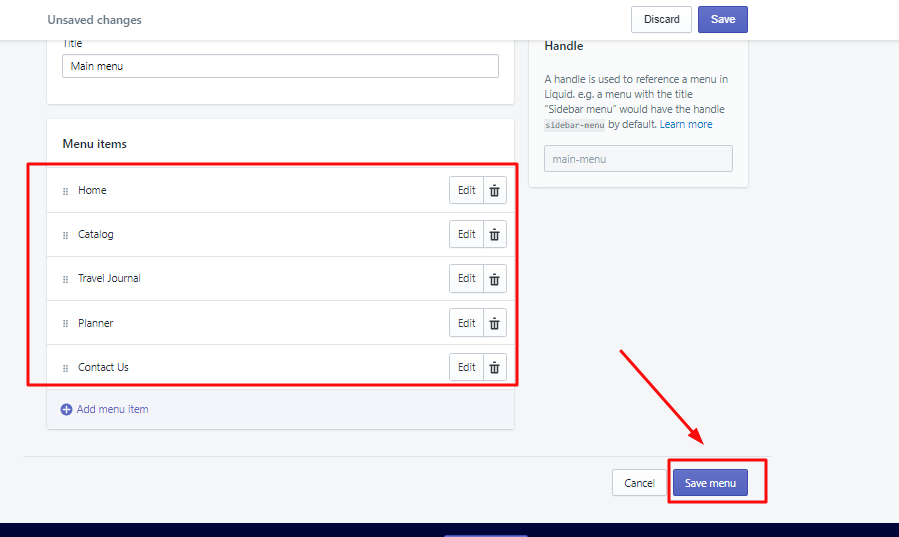
How to Add Menu to Shopify Store
Go to Shopify dashboard > click online store > navigation.
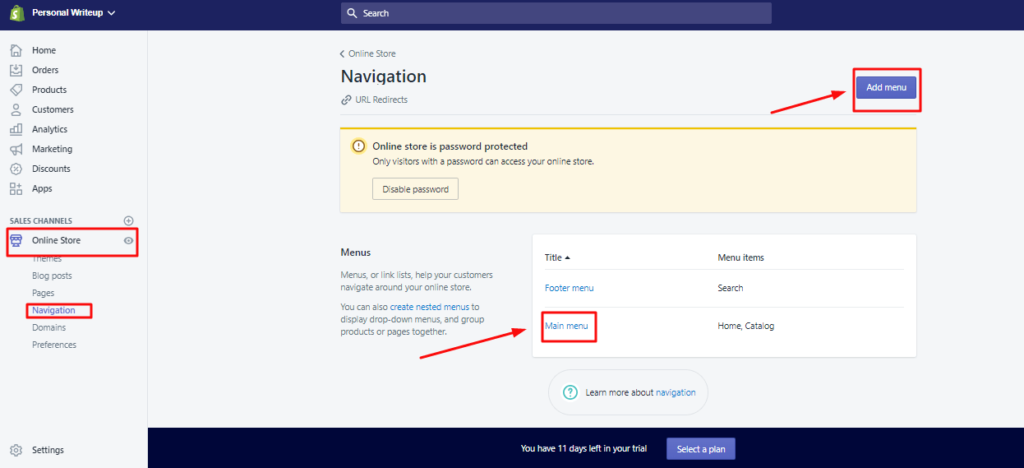
You can add new menu such as bestseller or new arrival.
As I have just started my store, I am going to edit my ‘main menu’.
Go to the main menu and click to ‘add menu’.
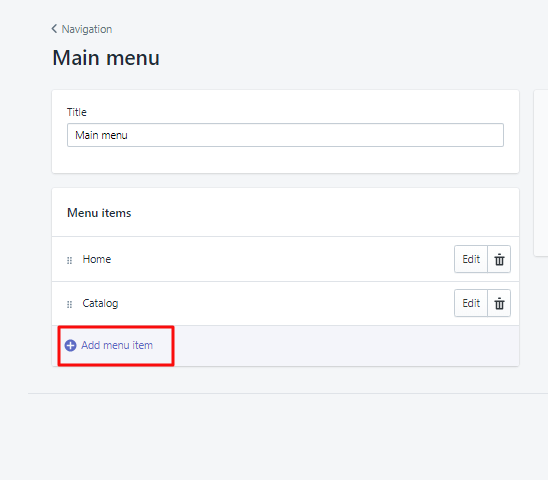
I am adding my collections on the main menu.
Here is what I did.
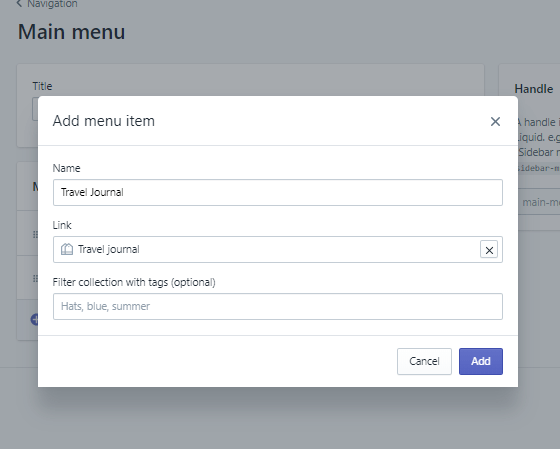
In the add menu item section I write the title ‘Travel Journal’ and go to the link option and select collections option and add ‘travel journal collection’ link.
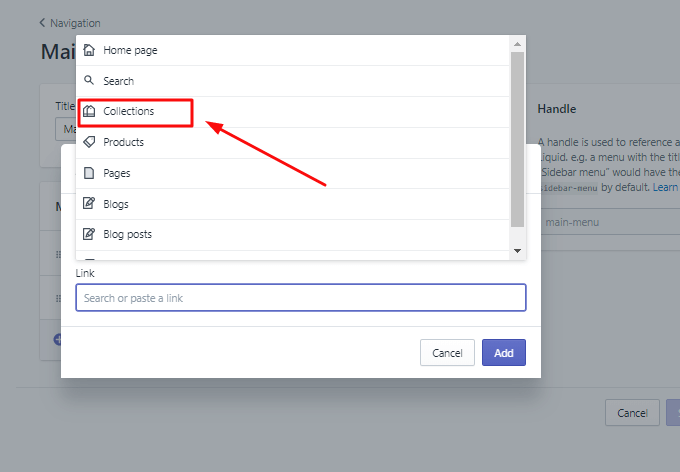
Likewise, you can add all the collection and pages in your main menu.
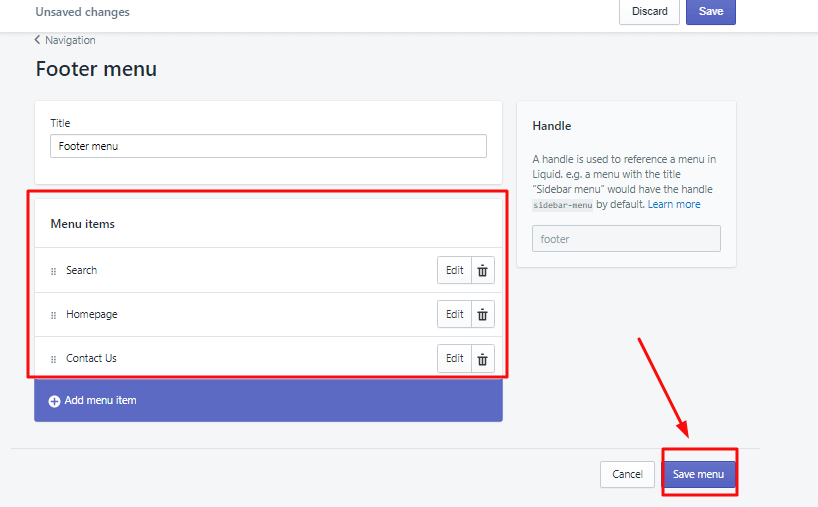
Similarly, like the main menu, you can also create a sub-menu for your footer.
Go back to navigation > Click footer > Add menu item.
I added the homepage menu in the footer.
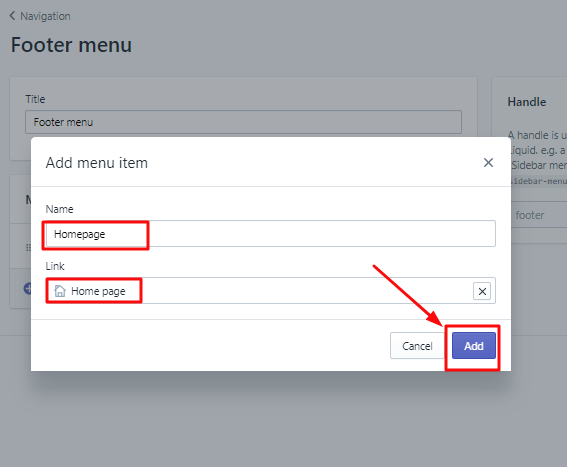
Add as much sub-menu in the footer as you like and save changes.
How to Add a Domain Name in Your Shopify Store
So far, your store name will be shown as storename.myshopify.com, to give it a better look you need to have store name.
Just below the navigation option, you will find the domain option. Click it.
It will give you the option to connect an existing domain name or buy a new one.
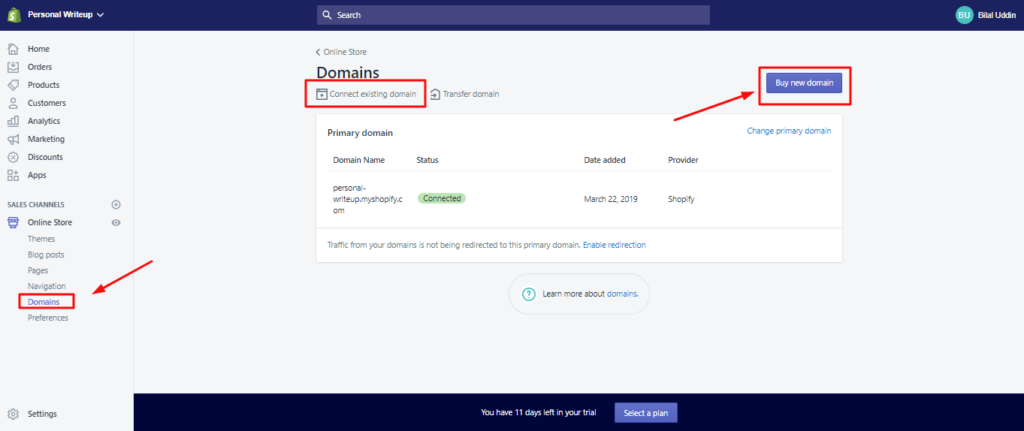
Select the option of buying a new one and write the name of the domain you want to have.
As I am looking for the domain of personalwriteup.com it is showing me the plan and other extensions of similar kind of name.
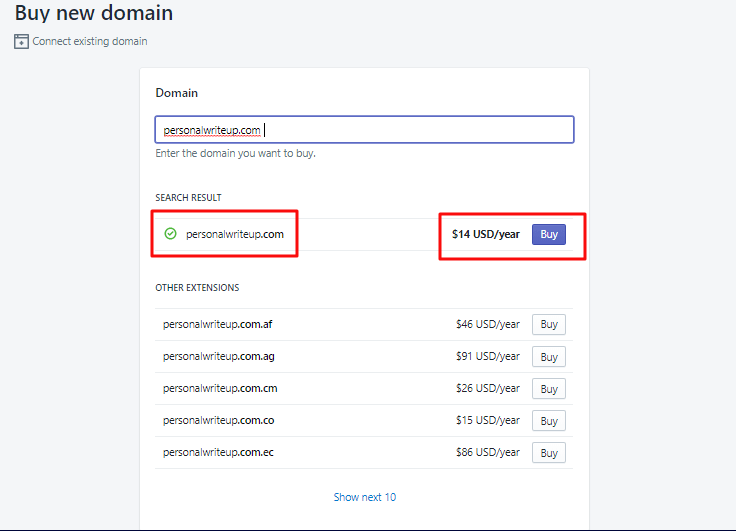
It will ask you for bank details for the transaction. After that, click continue and you will have the access of your domain.
How to Add a Blog Page in Your Shopify Store
You can also add a blog on your store as it is the ultimate tool to boost the SEO of your website.
Go to Shopify Dashboard > Online Store > Blog Post > Create Blog Post.

It is very much similar to WordPress where you can set title, write blog content, add feature image, add meta description and write excerpt.
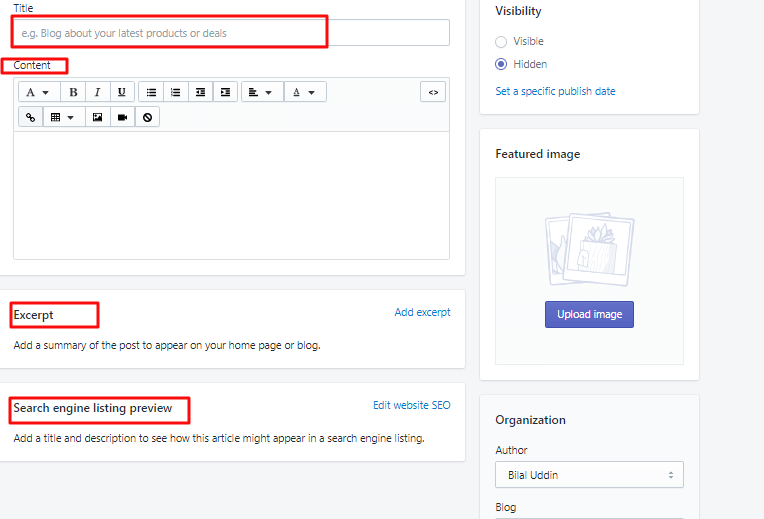
You can add blog post option in the menu bar or footer – as you prefer.
How to Select the Best Shopify Payment Plan
Free trial of Shopify is for the purpose to see how Shopify works.
To make your store live you need to buy a plan. The cheapest plan of Shopify starts from $29/month that is highly recommended for beginners.
How to see plans?
Go to the Shopify dashboard> setting > accounts.
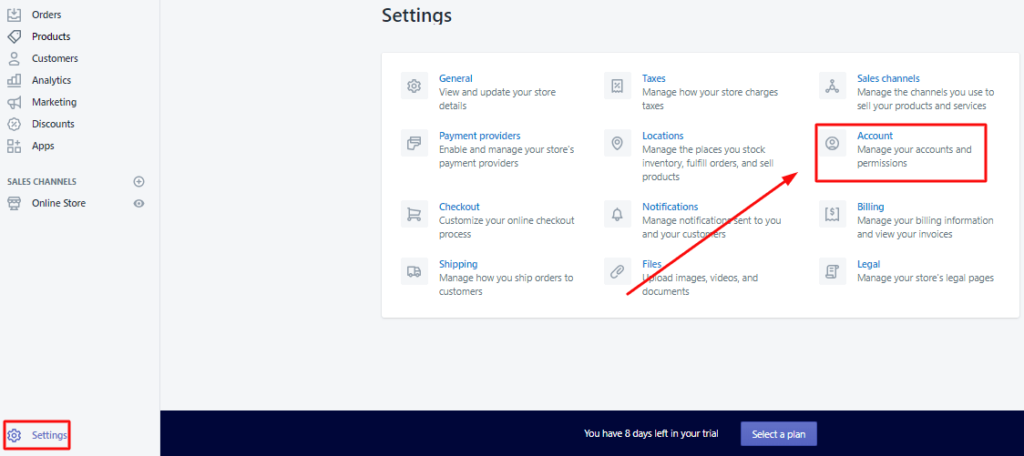
Select compare plans.
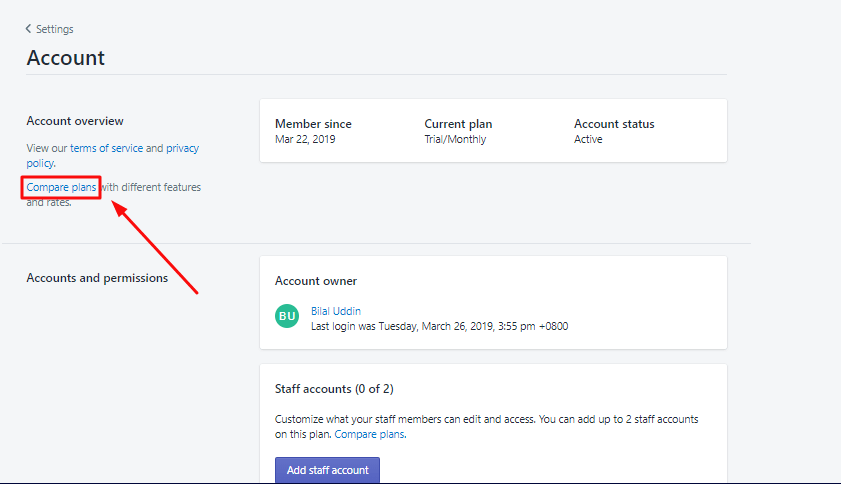
You can choose from any Shopify plan by clicking ‘choose this plan’ option.
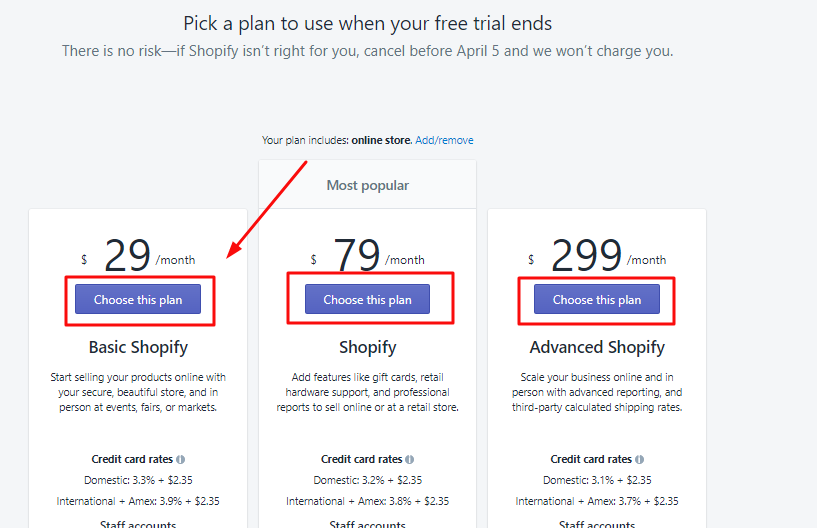
You will have the option to pay it monthly or yearly.
Provide your card information and click ‘start plan’.
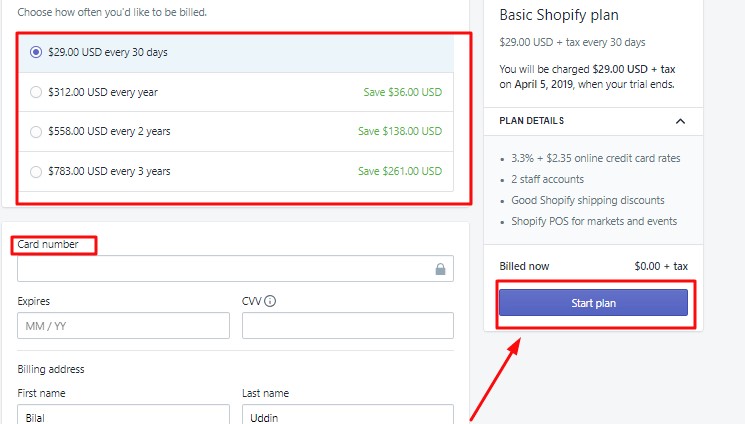
Your store is live now.
Start selling.
3 Simple Hacks to Find Product for Shopify Dropshipping
However, before selling make sure to target a perfect niche that could give you a profit of hundreds of thousands of dollar in a year.
Yes, I am not kidding, you can earn huge profits by just finding a perfect niche.
Finding niche was never that easy.
We make this process extremely simple for you.
Here are the three simplest hacks to find product for dropshipping.
Hack # 1 – Ecommerce Marketplace Search
Go to Aliexpress.com > Go to categories
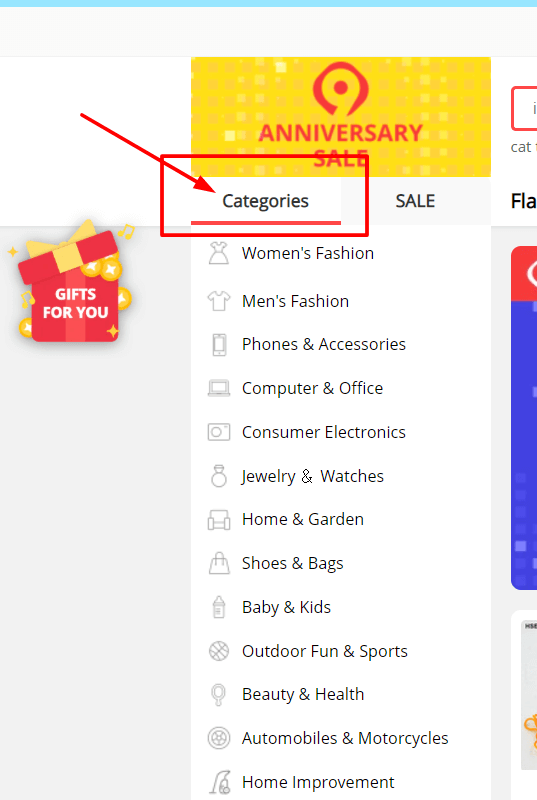
Select any broad category for instance, you mouse hover “phones & accessories” category.
From there you selected “car holder” from hot categories.
Next step you need to take is to open watchcount.com.
Select your country

Now you need to place the same keyword “car holder” in a search field.
Click on “Show Me” button.
Now you can see all current popular items of an eBay
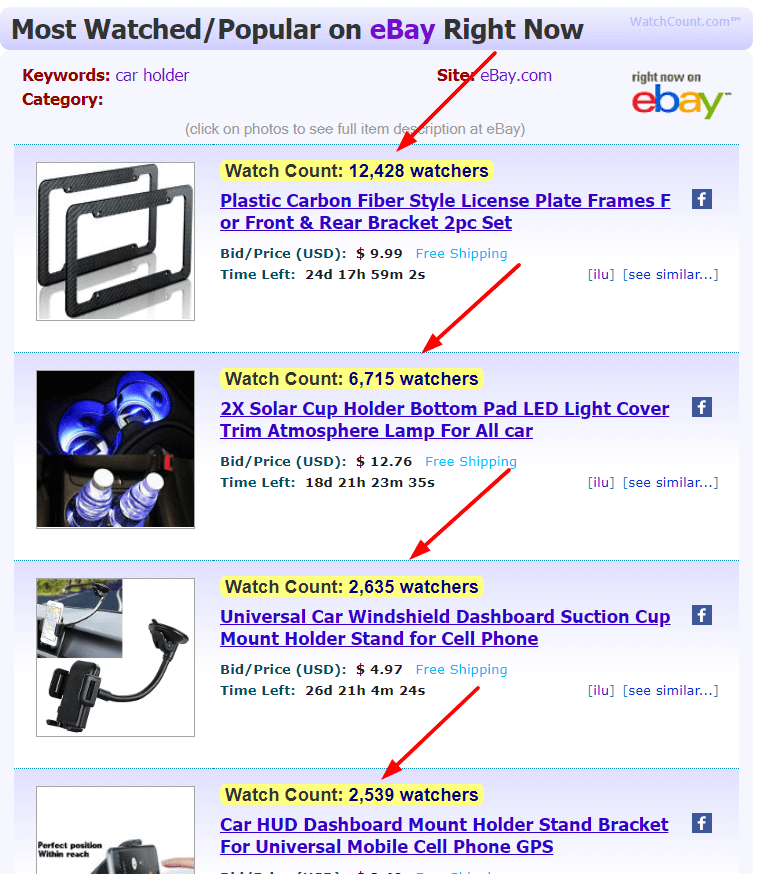
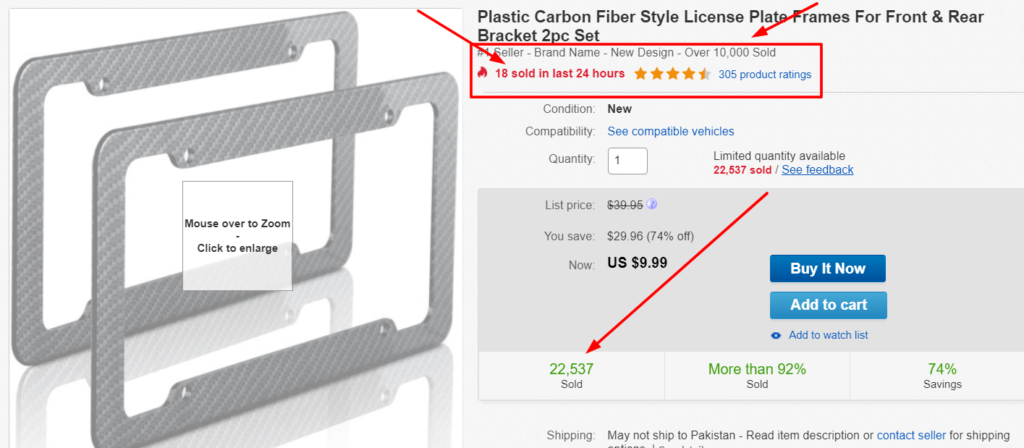
To verify this niche further, open any result.
For instance, I opened the first two results
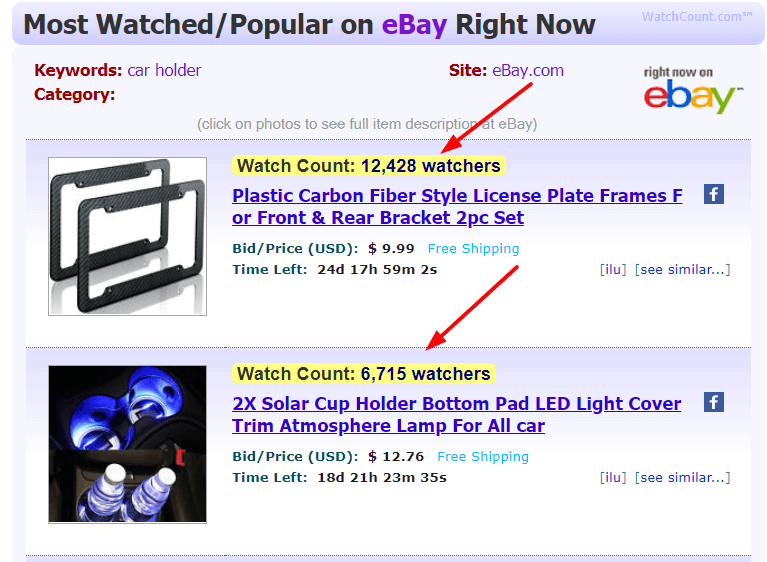
If you analyze the first result, you will get to know that it has already been sold 22,537 times and it was sold 18 times in the last 24 hours
Do the same for product # 2.
The product has already been sold 2894 times and currently this product has over 6715 watchers.
Therefore, it can be good niche for your dropshipping store.
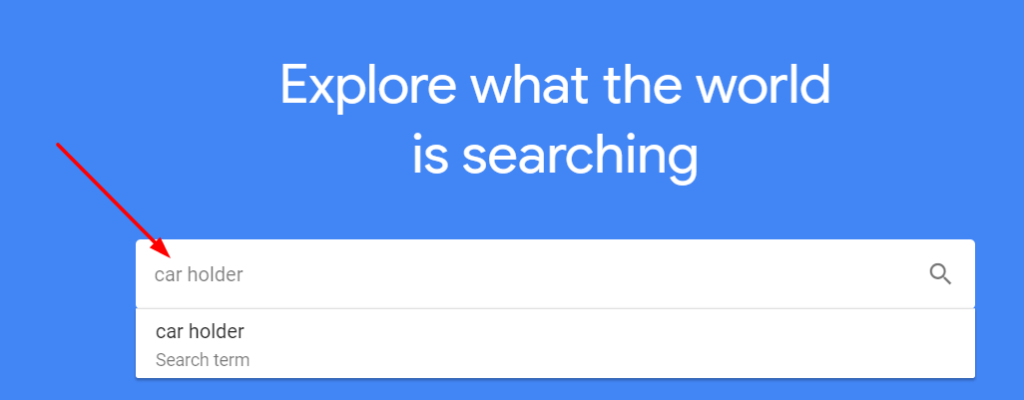
Hack# 2 – Google Trends
For further validation of your niche, you can check it on trends.google.com
Insert the same keyword to check its trend.
Now you can see the trend of this product in google trends as well.
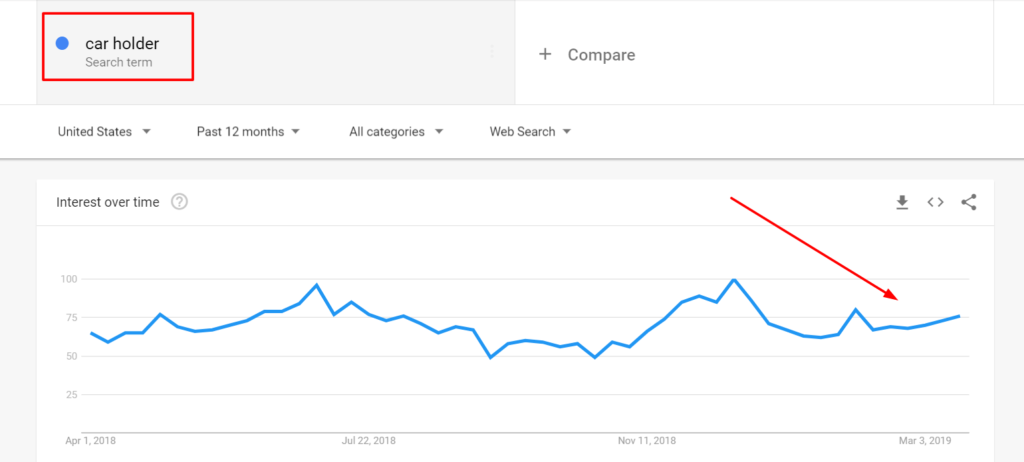
It is quite stable.
Second hack’s niche identification & validation complete: D
Hack # 3 – Facebook Search
The third hack you can do is to further validate and evaluate this niche on Facebook search.
Type car holder in a search field
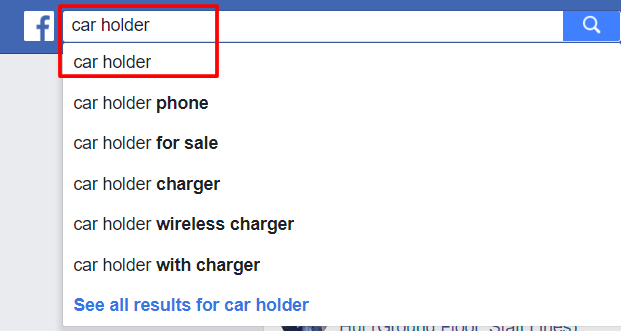
Go to the Videos tab to see if it is a good niche and enough buyers to sell.

And now, you can see that this niche has so many passionate & active buyers

That’s it that were the three simplest hacks to find the best niche for your dropshipping business.
Wrapping Up
I hope and can say with surety that this guide will come handy for you to establish your own Shopify dropshipping store.
This post contains all the necessary element and tactics that you need to know about starting a dropshipping business.
Although there is always a curve to learn more thing but for a newbie entrepreneur, these steps are enough to understand this market.
Nonetheless, if there is anything that you think you can add to make it more useful, do tell us in the comments below. Withintheflow highly appreciates your feedbacks.
Keep dropshipping, selling & learning!

Bilal is a passionate content creator and digital marketing enthusiast who loves to find hacks and creative ways to produce prolific outcomes in strategizing content. Bilal is also an avid reader who loves to read mysteries in his free time.
 Shopify vs BigCommerce Reviewing the Best eCommerce Solutions 2021
  Best Shopify Apps to Boost Sales on Your Online Store
  Shopify vs SquareSpace Comparison Review in 2021
  Shopify Review 2021 – Your One Stop Ecommerce Solution
Hello,
Thanks for the complete research about selling online. You have one of the best and most complete blogs on the topic.
You have done justice to this topic. I have been searching online for an in dept and easy to understand analysis of dropshipping and setting up shopify account. I learned a lot and you have answered my questions to the fullest. Kudos. Can’t wait to list you in my success story
Hello,
Thanks for the complete research about selling online. You have one of the best and most complete blogs on the topic. I’m still trying to get through all the links, admittedly, a daunting process.
There’s a few questions I have and possibly you can direct me to a source, or better yet allow me your personal ideas.
In way of background, I tried Cafe Press when it first appeared and had a few sales of original designs. For some reason got away from it and now suddenly there’s a long list of similar and expanded sites (your blog listings are a great help in that regard).
So…the most important question is what is the best way to integrate over a range of sites, say, t-shirt designs for starters? How many sites for the same designs, and, what is the current number ‘sellers’ have to be even mildly successful with a few products?
Secondly, you use the term “dropship” and that has a number of meanings. Do you mean that sites dropship from a stock of products that I have already manufactured? Or, are my products manufactured and shipped without an inventory, (the Spreadshirt/Cafepress model)?
Thank you for taking time to answer. Cheers!
NR
Washington DC
please feel free to email